 When we (molecule) were reverse engineering the Vita’s firmware years ago, one of the first vulnerabilities we found was in the bootloader. It was a particularly attractive vulnerability because it was early in boot (before ASLR and some other security features are properly initialized) and because it allowed patching the kernel before it booted (which expands what can be done with hacks). Unfortunately, the exploit required writing to the MBR of the internal storage, which requires kernel privileges. That means we would have to exploit the kernel (à la HENkaku) in order to install the exploit. (Before you ask, no it is not possible to install with a hardware mod because each Vita encrypts its NAND with a unique key. Also, there are no testpoints for the NAND, so flashing it is notoriously difficult… not as simple as the 3DS.) So, we mostly forgot about this vulnerability until quite recently when we finally all had some free time and decided to exploit it.
Vulnerability
The vulnerability is a buffer overflow due to the bootloader statically allocating a cache buffer for eMMC device reads using a constant block size of 512 bytes but when it actually loads the blocks into the cache, it uses the (user controlled) block-size field in the FAT partition header. We exploited it by overwriting a function pointer that exists after the cache buffer in the classic buffer overflow fashion. The vulnerability is relatively straightforward but we had to employ some tricks in exploiting it (especially in trying to debug the crash). xyz will talk about this in more detail in his blog post (TBD), I will focus more on what happens after we take control.
As far as we know, 3.61-3.65 are still vulnerable. However, as I’ve said in the beginning, you need a kernel exploit to modify the MBR (needed to exploit) as well as to dump the non-secure bootloader (to find the offsets to patch). Nobody in molecule is interested in hacking anything beyond 3.60 because Sony isn’t shipping any new consoles globally with newer firmware versions–anyone who wishes to run homebrew can choose not to update. However, if you’re already updated past 3.60 and you wish to run homebrew possibly in the future, my advice is to not update past 3.65 because someone else might find a new kernel exploit and allow you to install this hack on 3.65. Don’t hold your breath though. Anyone can dump and reverse the kernel code with HENkaku, so maybe there will be extra motivation for outsiders to find a new hack now.
Because 3.65 is still vulnerable, it is also possible for someone to build a custom updater for 3.60 that flashes 3.65 and HENkaku Ensō at the same time and use the same CFW (taiHEN) on 3.65. This would allow you to play new games blocked on 3.60. However, to do that, someone would have to dump the 3.65 non-secure bootloader in order to find the offsets and rebuild the exploit (which is open-source). Again, this requires, at the very least, a 3.65 kernel exploit (and perhaps another exploit as well because WebKit actually thrashes the memory that NSBL resides in and if you exploit kernel after WebKit runs, it’s too late to dump NSBL but I digress). Another way, perhaps insane, is to try to guess the offsets. The best case scenario is that none of the offsets changed (since 3.61-3.65 are all very minor updates). You can build custom hardware that tries different offsets and reset the device if it fails. Honestly though I think it would be easier to just find a new kernel exploit at that point.
Design
In creating Ensō, we had a couple of major design goals
- Allow loading unsigned driver code as early as possible. This will enable a greater variety of hacks to be developed.
- Support recovery in case of user error. We don’t want a bad plugin to brick the Vita.
- Reuse as much of the current infrastructure as possible. taiHENkaku is tested and it works and we don’t want to fragment the already tiny homebrew ecosystem. Fortunately, taiHEN was designed with this use-case already in mind.
It is a bit tricky to meet all of these goals simultaneously. For example, if we want plugins to load before SceShell, then a bad plugin might ensure SceShell never loads and recovery not possible. If write a custom recovery menu, then we would also need to write custom graphics initialization code (for OLED, LCD, and HDMI) as well as code to handle the control pad and USB/DualShock 3 for the PS TV. All that custom code in a recovery menu would make recovery itself unstable, which defeats the purpose. On the other hand, if we take over Sony’s recovery mode, that loads very late in the boot process and might not be good enough to recover from bad kernel plugins. In the end, we decided to re-use as much of the functionalities that already exists as possible instead of implementing new ones. That way we do not have to rely on extensive testing and debugging of “CFW features” and instead rely on Sony’s firmware along with HENkaku to already be working. The new code that Ensō adds to the system is minimal. Less new code means less chances for something to go wrong and less effort required for testing.
Boot Process
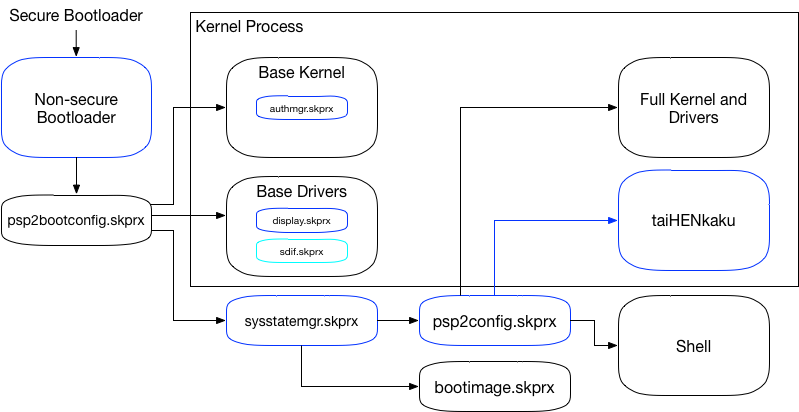
Before discussing the design of Ensō, I should explain how Vita boots into its kernel. A description of the secure boot chain and the complete boot sequence can be found in the wiki. Here, instead I will zoom in and explain in more detail the last chain of the boot sequence: kernel loading in non-secure world.
The non-secure bootloader (henceforth: NSBL) has its own embedded version of the base kernel modules: SceSysmem, SceKernelThreadmgr, SceModulemgr, etc that it uses before the base modules are loaded. Using the internal loader, NSBL first instantiates a stub loader named os0:psp2bootconfig.skprx, which has hard coded paths to the base kernel modules along with the base driver modules (such as SceCtrl, SceSdif, SceMsif, etc). It also selects which display driver to load (SceOled, SceLcd, SceHdmi) and after the framebuffer manager (SceDisplay) is loaded, the boot logo shows up on non-PSTV models. The last module in this phase is SceSysstateMgr, which is responsible for migrating the NSBL state to the kernel (so, for example, SceModulemgr can take control of the modules loaded by the embedded NSBL loader). It then creates and switches to the kernel process (pid 0x10005), cleans up the pre-boot process, unmaps NSBL from memory, and loads the boot configuration script.
The boot configuration script syntax is documented on the wiki. It supports simple commands like load path.skprx to load a module and simple control flow such as if SAFE_MODE to only perform the proceeding commands if the console is booting to safe mode. The script is, of course, signed and encrypted and is different for PS TV (to load drivers for the DualShock 3, for example). The final command in the script is to spawn either the LiveArea process (SceShell) or the safe mode process (in safe mode) or the updater process (in update mode).
The diagram above is a summary of this process. Not mentioned is bootimage.skprx, which is an (encrypted & signed) archive of many of the kernel modules loaded by the boot script. I am not sure why some modules are in this boot image while others are stored as files on the os0 partition but I don’t think there is a reason. The arrow indicates boot order dependency. The blue boxes, as detailed below, are what gets patched by Ensō.
Taking Over Boot
The exploit allows us to control code execution in the non-secure bootloader, so our job is to maintain control while allowing the rest of the system to boot. If you look at the diagram again, you can see that there are three stages of boot before the kernel is completely loaded. The first stage is NSBL, which we control from the exploit. The second stage is loading the base kernel and drivers using the loader inside NSBL. One module in the base kernel is authmgr.skprx, which does the decryption and signature checks for any code loaded by the kernel. The first patch we make is to disable these checks for unsigned code. Next, we want to make sure taihen.skprx and henkaku.skprx are loaded at boot. The perfect place for this is in the boot configuration script. So the next patch is in sysstatemgr.skprx to support loading a custom (unsigned) script. Finally, we append load ur0:tai/taihen.skprx and load ur0:tai/henkaku.skprx into the custom script and this should load our unsigned modules at boot.
There’s a couple of other minor details though. We want a custom boot logo because that is the table dressing that all custom firmwares have. To do this, we simply patch display.skprx when it is loaded by NSBL. Next, we need to ensure that our MBR modifications to trigger the exploit does not break the kernel. This requires us to patch the eMMC block device driver at sdif.skprx where we redirect reads of block 0 to block 1 where the Ensō installer has stored a copy of a valid MBR. With these patches in place, we can start taiHENkaku on boot. As a bonus, because we can modify the boot script, we can also enable certain features such as the USB mass storage driver on handheld Vitas.
Recovery
Hacking the system early in boot is very dangerous because errors may result in a bricked system. There are two potential problems that arises. First, because we load an unsigned boot script, if the script is corrupted either by user error or other means, then the system will not boot. The Vita has a built-in “safe mode” but that depends on a valid boot script. Second, if there is a bug in taihen.skprx or henkaku.skprx, the module might crash the system before the user has a chance to update the files. The solution we decided is to disable (almost) all patches if the Vita is booting into safe mode (either by holding R+PS button during boot or by removing the battery during boot and plugging it back in). The only patch we can’t disable is the one in sdif.skprx (marked in cyan in the diagram above) because that patch ensures our exploit MBR does not mess up the kernel. As a consequence of disabling the patches, the default (signed & encrypted) boot script is loaded as well as the safe mode menu.
Since we store all the hack files in ur0: (the user data partition), if user selects the reset option from safe mode, it will delete the (corrupted) custom boot script as well as taiHENkaku. Then when they reboot back into normal mode, the patched sysstatemgr.skprx will see that the custom boot script is not found and fall back to the default boot script. The user can then install HENkaku from the web browser and reinstall a working boot script using the Ensō installer.
We also provide another layer of recovery. If you attempt to reinstall the 3.60 firmware from safe-mode, this should remove the Ensō hack as well. This works because the updater will always change the MBR, so because our block 0 read patch redirects block 0 to block 1 but does not redirect writes to block 1, the updater will read the valid MBR and then update it and try to write it back to block 0 where it will wipe the hacked MBR. This also ensures that if a user accidentally updates to, say, 3.65, it will make sure Ensō is wiped otherwise the user will have a permanent brick. Of course, the Vita will no longer run homebrew, but that’s still better than a brick.
All this means that as long as the user does not modify the hack sectors in the eMMC or modify the os0 partition, they would be able to recover from any mistake. The Vita mounts os0 as read-only by default so there is no chance for an accidental write there. Additionally, with the custom boot script, the hackers will never have a need to modify os0 when they can instead boot modules from other partitions such as ur0.
Testing
The last and most important step in this journey is to make sure the design is properly tested. Because of the recovery mechanisms, as long as the installer works and the sdif.skprx patch works, any other error can be recoverable. As much as we can test internally, we do not have enough devices and configurations to cover the wide variety of hacked Vitas out there. That’s why I asked members of the hacking community to potentially sacrifice their Vitas in testing the hack months before the release. As long as the testers are willing to take the risk of a bricked Vita, they can be on the “front line” in installing and using the hack. If anything wrong happens, they will let us know and we will catch the bug before it goes out to the masses. I created a sign-up and made sure the risks of being the first to run such a hack is explicit. After opening sign-ups for a day, I got 160 responses back. From those responses, I invited 10 people a day for 10 days to participate in the beta.
Test Guide
To facilitate the test process, I wrote a guide that testers can follow along to install, uninstall, and recover Ensō. I asked testers to video record the entire process in case anything goes wrong and to send us the video if it does go wrong. Because the test requires following precise instructions, I wanted to filter out candidates who either do not have the necessary English skills to understand the instructions or are too careless to follow them. That way, I can be more confident in the collected data and that, for example, nobody is just answering yes to everything. Additionally, for their own good, I didn’t want to allow people who just saw the word “beta” and ignored all my warnings to run the beta builds. I wanted to make sure that the participant fully understands the risk they are taking on and consent to it. To do this, I added a simple reading test at the beginning of the guide.
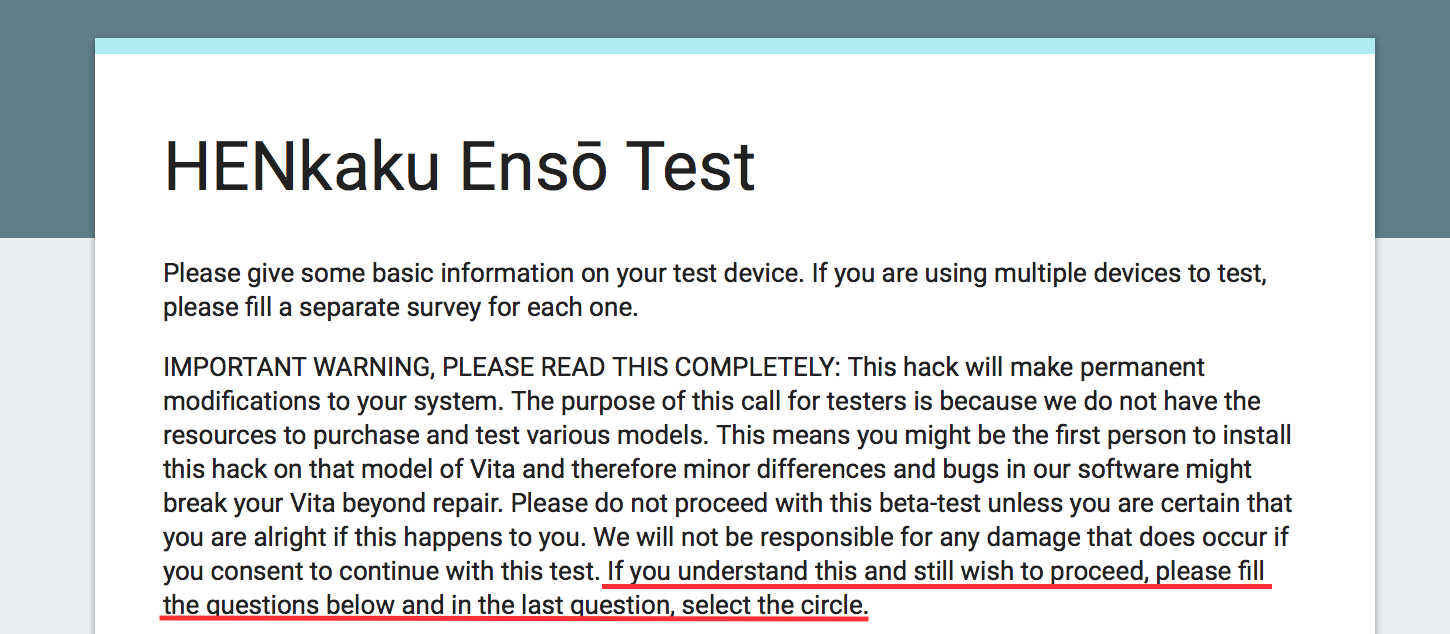
and at the end of the page
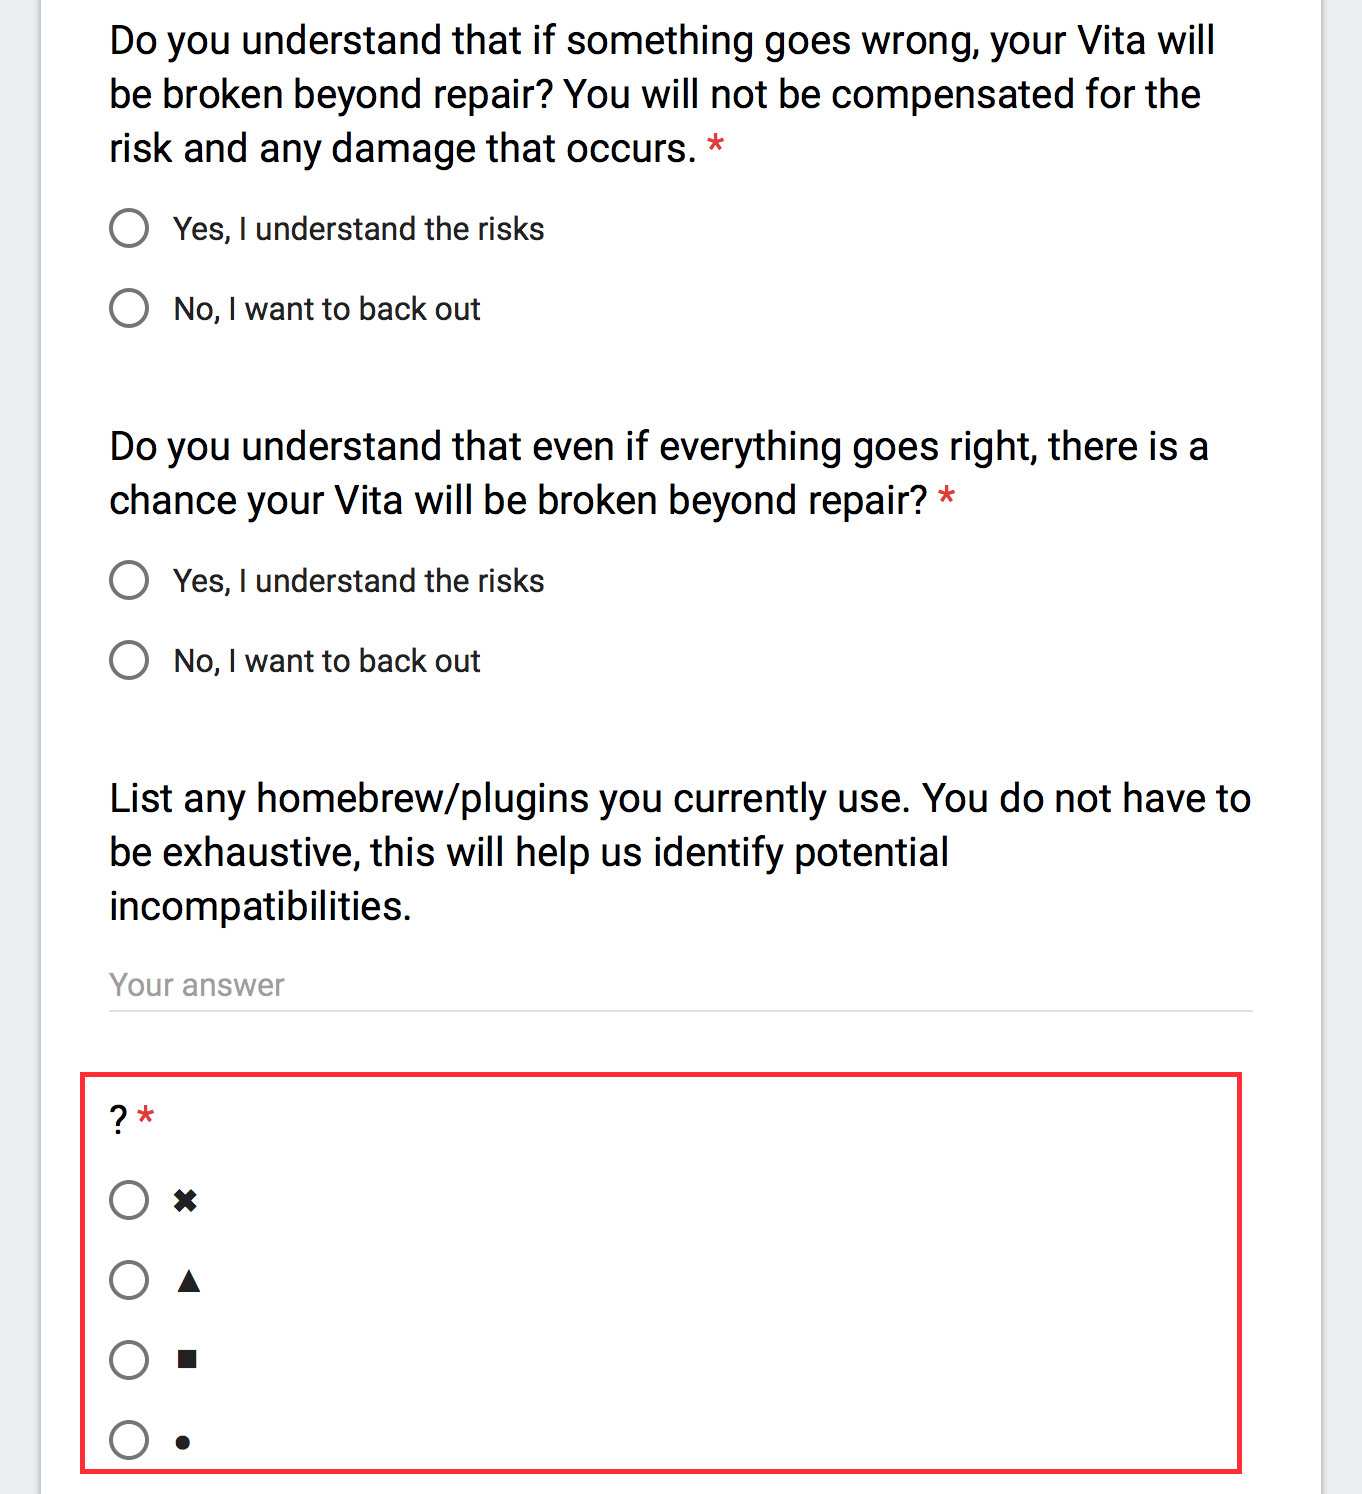
Not surprisingly, a good number of people failed the reading test on their first try. After passing it, the guide went through 7 scenarios including installation, fallback when HENkaku is not installed, fallback when custom boot script is not found, uninstallation, safe mode, and recovering from bad boot scripts.
Results
Out of about 100 invited testers, 67 completed the test guide (including passing the reading test which filtered out many people). The testers were broken into 10 groups assigned daily to ensure each new build has been tested.
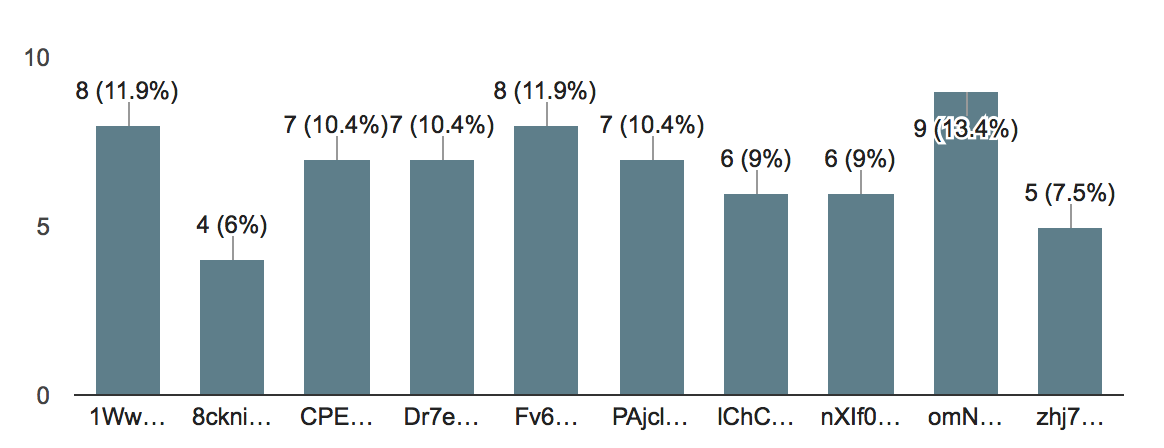
Out of the 67 testers, we had a good distribution of devices tested with.
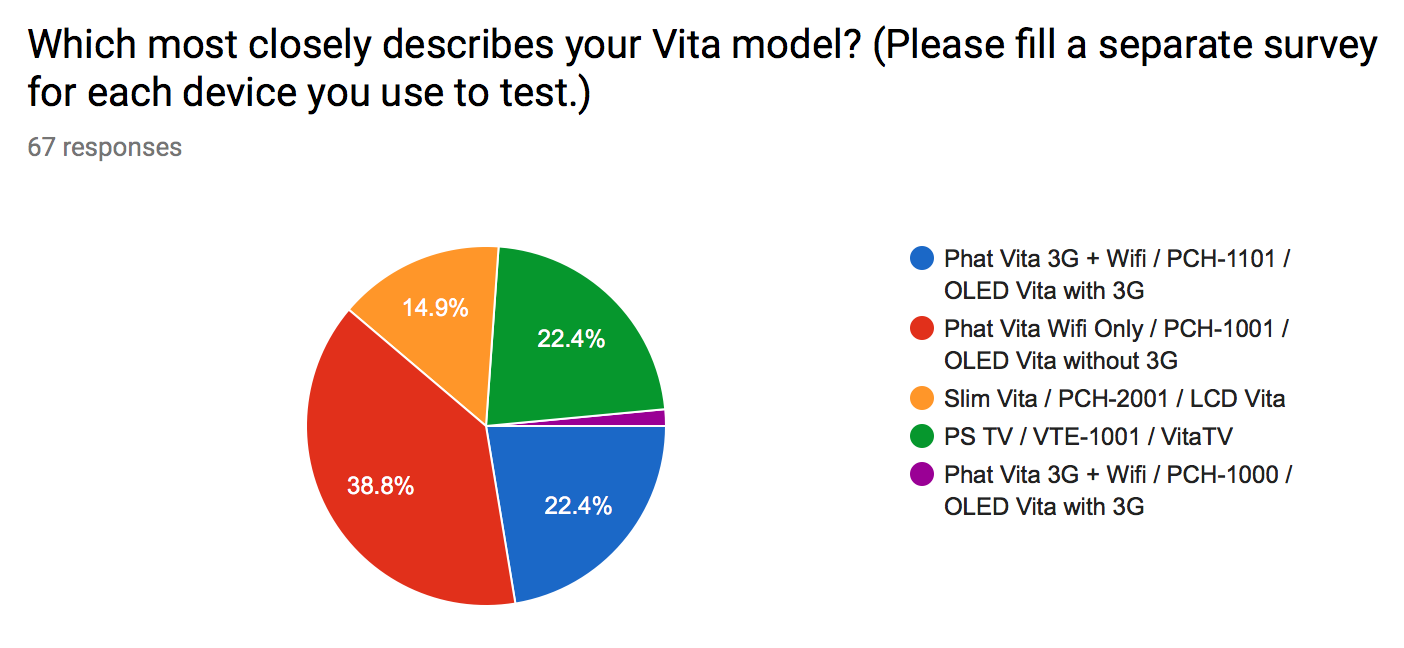
There were only two permanent bricks. They were the first two testers on the very first build. We quickly identified the issue and fixed it and there were no more bricks for the remainder of the test. There were also two testers who suffered non-fatal installation failures.
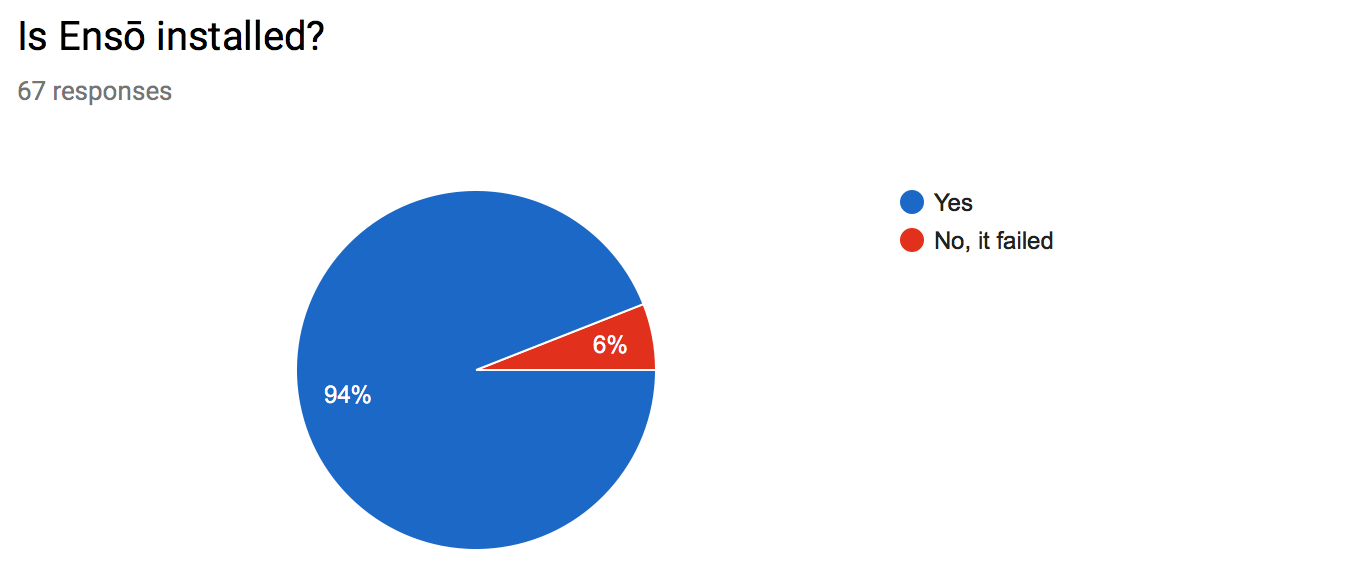
All in all, most testers reported no issues with any of the test scenarios. However, there were some common hurdles that we have addressed thanks to the feedback.
- When booting into SceShell with version spoofing, the Vita writes the “current” firmware version into
id.daton the memory card. This “feature” is to prevent users from taking a memory card from a Vita running the latest firmware and moving it to a Vita running a previous firmware. However, once you uninstall Ensō, this “feature” is triggered causing the Vita to reject the memory card unless it is formatted. To address this, HENkaku R9 disables theid.datwrite. - If the user switches their memory card and the memory card has an older version of HENkaku installed, it might crash SceShell and the only way to use the memory card is to format it to delete the older HENkaku files. To address this, HENkaku R10 installs everything to
ur0which is the built in system memory.
Thanks
Thanks to all our testers for taking the risk and helping us improve the installation process and fix many bugs. Thanks to motoharu for his wiki contributions that sped up the development of the eMMC block redirection patch. Big, big thanks to @NickLS1 for proving us with hard-modded Vitas to test and develop with. Thanks to all our friends who knew about the exploit and kept it under wrap at my request because we knew Sony hadn’t patched it yet at the time.
If you want to take a look at the source, it is up on Github. Please don’t try building and installing your own build unless you are absolutely sure of what you’re doing. Any minor mistake will result in a unrecoverable brick.
Pls just port henkaku to 3.67 and let the vita be fully hacked
Consider it done, Avishai. Lemme finish my dinner first
Have a Vita with latest HENkaku and Enso. But id.dat still appears at the root of the memory stick with spoofed version in it.
Totally true if u can just port the henkaku CFW to 3.67 and let the vita be fully hacked !
Awesome write up. Love reading these things.
Awesome work guys. Thanks for the writeup :)
Only two bricks is not bad! Currently enjoying Ensō on three Vitas :D
so apparently this was patched in 3.67?
saaaaaaaaaaaaaaaaaaaaaaaaaaaaaaaaaaaaaaaaaaaaaaaaaaaaaaaaaaaaaaa
Hi where can buy ps vita molecule???
Dear Sir Yifan Lu, Good day… The molecule logo/enso was freeze in my Psvita 3.65. I done all in safe mode and hold L but still freeze. This was happened when i run the CexToRexVITA plugin and accidentally turn-off the unit. Im very appreciate of your assistance. Thank you and more power
Very fine job you did there mate. It’s just sad Sony discontinued Vita, what a wonderful handheld console. People like you are the reason why this console will last a long bit.
Hola, mi pregunta es: si yo hago todo el proceso correctamente en una memoryCard d 8gb y luego la cambio x una d 64gb digamos, tengo q hacer nuevamente todo el proceso?