One thing I love about Vita hacking is the depth of it. After investing so much time reverse engineering the software and hardware, you think you would run out of things to hack. Each loose end leads to another month long project. This all started in the development of HENkaku Ensō. We wanted an easy way to print debug statements early in boot. UART was a good candidate because the device initialization is very simple and the protocol is standard. The Vita SoC (likely called Kermit internally as we’ll see later on) has seven UART ports. However, it is unlikely they are all hooked up on a retail console. After digging through the kernel code, I found that bbmc.skprx, the 3G modem driver contain references to UART. After a trusty FCC search, it turns out that the Vita’s 3G modem uses a mini-PCIe connector but with a custom pin layout and a custom form factor. The datasheet gives some useful description for each pin, and UART_KERMIT seemed like the most likely candidate (there’s also UART_SYSCON which is connected to the SCEI chip on the bottom of the board, which serves as a system controller and a UART_EXT which is not hooked up on the Vita side). So finding a debug output port was a success, but with the datasheet in front of me, the USB port caught my attention. Wouldn’t it be neat to put in a custom USB device?
On USB in the Vita
A quick aside on the various USB ports found in the different models of the Vita.
- The top port on OLED models (commonly referred to as the “mystery port” and incorrectly referred to as a “hidden video out port”) is a USB host. It is unknown if the port is enabled by default or how to enable it.
- The bottom port on OLED models (sometimes called the “multiconnector”) supports UDC (USB client) but can also enable USB host support. It is unknown how this switch is controlled, but I’m guessing the syscon is involved and it’s likely USB OTG.
- The microUSB port on LCD models have the ID pin connected which implies support for USB OTG or something like it. However, it is unknown how to activate this feature.
- There is a USB type A port on PS TV.
- There is also a USB to Ethernet chip in the PS TV for the Ethernet port that is connected to Kermit via USB.
- The audio codec chip is connected to Kermit via USB for all models.
- and of course, the 3G modem on OLED models is connected by USB. On Wifi only models, VDD to the unfilled mini-PCIe pad is missing a bridge. The USB D+/D- signals are also missing a ferrite bead under the adjacent shield. It is unknown if bridging these three locations will enable the USB port on wifi models or if extra work is needed.
Designing a microSD adapter
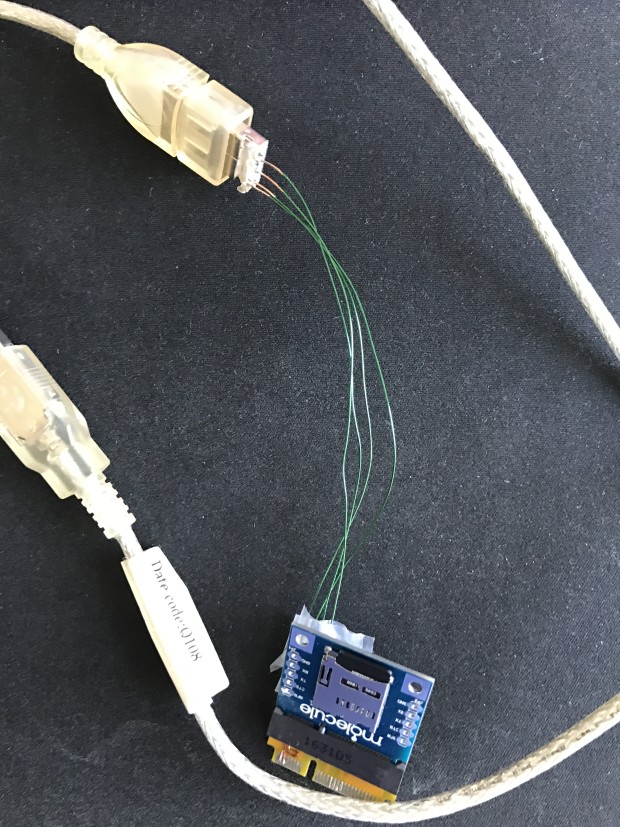
In order to become more familiar with hardware design as well as understand how USB works on the Vita, I thought it would be fun to create a custom Vita USB device that fits on the modem port. The main reason I chose this port aside from the other USB ports is that it is the easiest to build. It is just a matter of designing and fabricating a PCB, which is simple to do. In comparison, connecting to any of the other USB ports would require creating custom adapters, molding plastic, and dealing with mechanical issues. Creating an adapter for the external ports is also not exactly a usable solution as the Vita is supposed to be portable, and having to dangle a USB port is not something most people are willing to do. In addition, my custom Vita modem card can expose the UART port to work as a console output device (which started this whole project). For this first project, I wanted to build a microSD adapter. Vita memory cards are notoriously expensive, with 32GB cards retailing for $79.99 USD. In comparison, a microSD card with similar performance and capacity goes for $12 USD. Therefore, it would be immensely useful to use microSD cards as a USB storage replacement for the proprietary Vita memory cards.
Choosing parts
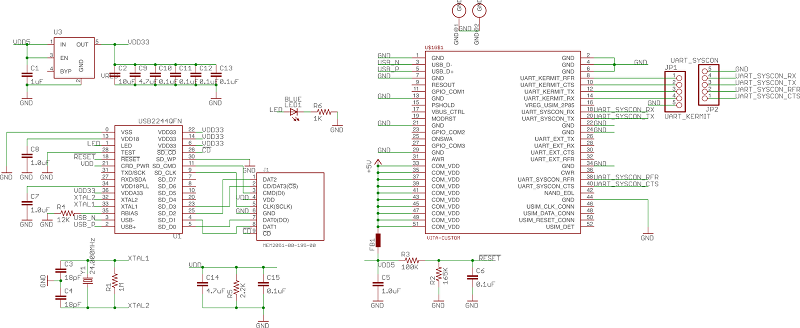
SD to USB ICs are pretty cheap and common–you find them in any USB SD adapter. A quick research shows that most cheap adapters use an Alcor or Genesys chip. There is also the MAX14500 series chip from Maxim that is no longer in production and the Microchip USB2244 chip. The documentation for the cheap Asia manufactured chips were lacking so I went with the USB2244 even though it is more expensive (I don’t plan to mass produce it anyways). Microchip provides good documentation in comparison, complete with layout guidelines and a reference design. Unfortunately, I can’t find an Eagle library for the USB2244 so I had to design it myself (using Sparkfun’s tutorial).
Next, I needed an Eagle part for the Vita modem form factor. Luckily, I found a good part for mini-PCIe and was able to modify it to the custom size that Vita uses thanks to the drawing in the datasheet.

Schematic
Next is connecting the parts together. Having no experience whatsoever, I turned again to Sparkfun’s tutorials. Copying the reference design, I came up with a board with the microSD adapter and pin headers for the UART.
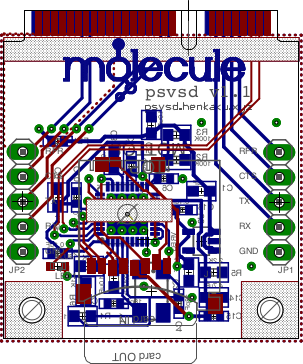
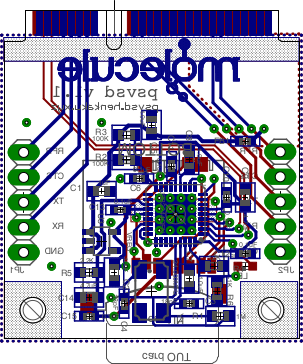
Layout
I learned board layout again from Sparkfun making sure to follow the design guidelines from Microchip. I also cheated by looking at the layout for the reference board and ensuring that relative distance between objects match from my design. The main challenge is in routing because of the constrained size, but through some creativity, I managed to hook everything up.
Manufacturing
Next step is to produce some prototypes. Thankfully this is extremely easy in this day and age. Pcbshopper allows you to choose your design requirements and it will search across many PCB manufacturers for the best price. The price (plus shipping) is similar across many Chinese manufacturers–about $15 for 10 boards with standard options. The catch is slow lead time and even slower shipping. Throughout the project, I’ve tried EasyEda, SeeedStudio, DirtyPCBs, and PCBway. Below is a mini-review of my experiences with each fab.
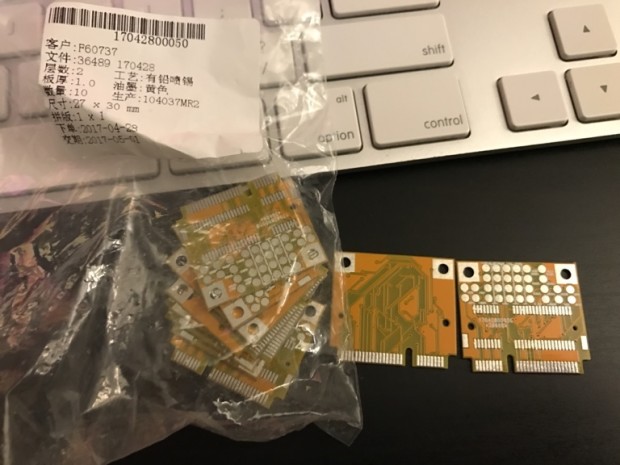
I used DirtyPCBs for the breakout adapters. The shipping time is the fastest per dollar (using the cheapest shipping rate, I got the package in two and a half weeks). The board quality was good but a couple of the adapters had the PCIe connector cut improperly and therefore won’t fit the Vita without some sanding. There was no problem with the wiring or drills even though I used the smallest allowed sizes.
I purchased the first three prototypes from SeeedStudios because their website was the easiest to use and the cleanest of everyone on PCBshopper. The cheapest shipping was slow (took almost a month to arrive) and more than half the adapters I received had the PCIe connectors not cut properly. I found no electrical problems.
EasyEDA had the best quality of all the fabs I’ve used. All the cuts were good and the drill holes were very precise and exactly centered. They do not offer cheap shipping and build time was a couple days longer than their estimate of 2-4 days. I also ordered a stencil from them and that came out great as well.
PCBway would be my recommended fab. Although the quality was not as excellent as EasyEDA, it was still better than the other fabs (no issues with the connector). They also do not offer cheap shipping but their build time is a couple day faster than EasyEDA. More importantly, PCBway offers a competitive rate (5x cheaper than SeeedStudios) for PCB assembly and eventually became the fab that produced the final production run for this project.
Prototyping
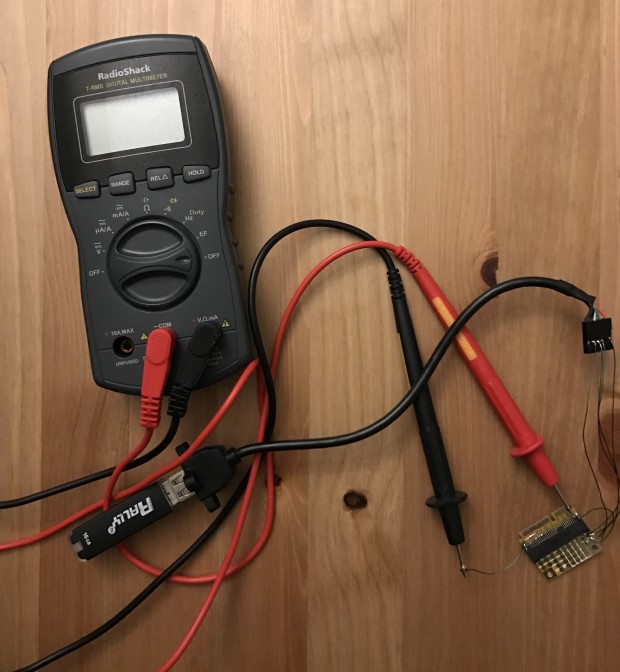
What’s the most cost effective way to debug the design? Considering how cheap it is to build these boards, it is no surprise that the best way to debug is to build another board. I created a second mini-PCIe based design–this time with a mini-PCIe socket on the card to act as a breakout board. Because the design for the breakout board is simple, the only requirement to verify the board is to do connectivity test on each pin after it arrives. Then I can probe the pads on the breakout port to debug the signals on the main design.

Using the breakout board, I can inspect the signals from the 3G modem in anticipation of some sort of custom handshake protocol. Fortunately, there wasn’t such a sequence and the USB port works as-is. When the first boards came back (a month of waiting), I was able to test it by connecting the USB pads on the breakout board to a USB cable and connect the psvsd card to the computer.
Immediately, I found some errors and fixed it in the design. Having a test plan ready by the time the boards arrived really sped up the process.
Funding
The nice thing about software hacking as a hobby is that it costs nothing but time. But for this hardware hack, I have spent a little over $100 on this project in parts, supplies, and boards. That’s less than buying two video games, so I have no qualms about the cost, but considering the interest the community showed, I think it would be more than fair to spread the cost across everyone who is interested. My idea is this: I will make a limited production of 100 boards (no more because I will be shipping the packages myself and it’s fairly laborious). These boards will be sold at cost and an extra $1 will be added to cover my expenses. I have heard many horror stories of crowd funding gone wrong, so I took many steps to ensure that this will be a success.
First, I made a spreadsheet covering all the costs: supplies, boards, shipping materials, platform fees, etc. Then I added a $100 buffer for any extraneous expenses (another prototype run, for example). Next, I made sure to be very clear upfront about what contributors are paying for: the supplies for me to develop this project. Because undoubtedly, manufacturing 100 boards at such a low cost will not have a perfect yield, I know a small number of these boards will have defects. I don’t have the time or money to deal with customer service for these issues, so part of the low price of the boards is that each contributor takes some amount of risk that their board is defective. Finally, I set a fixed goal so I do not receive the money until after 60 days. I am spending my own money in the meantime. My hope is that after 60 days, I’ll either complete the project and use the unlocked money to reimburse myself and fund the limited production. Or, I’ll run into some major unresolvable issue, in which I will refund everyone and just lose the ~$200 I spent so far. However, after a month of steady progress I felt confident enough to take 400 more orders for a total of 500. Then after getting lots of good samples from the fab I also felt it was fine to test and ensure that every adapter works before shipping it out.
The feedback was tremendous, and the funding goal was met in a day after it was posted. That gives me enough confidence and motivation to continue the project and ensure it is a success.
Software
Fortunately, the driver is pretty easy to create. The Vita already has drivers for USB storage (it’s used on PS TV safe mode for reinstalling firmware), but is normally disabled. A simple patch running on HENkaku Ensō enables it at boot and using The_FloW’s patches for mounting USB storage as a memory card, it all pretty much just works.
Testing
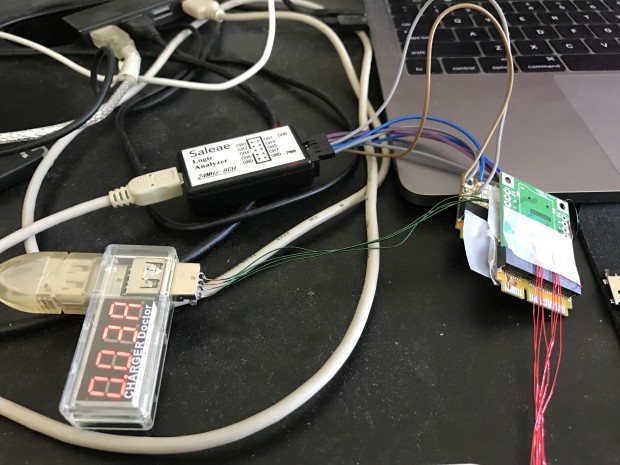
Next is an important part that I feel many ambitious project leaders skip–which is testing. I want some real-world usage data and more importantly, I want to know what the battery impact of my design is. This was the first hurdle I ran into. Initial results showed that the battery life lasted an hour less with psvsd installed when idle. Worse, the battery was consumed even when powered off (not lasting overnight). This is unacceptable for daily use. I took one of my breakout boards and re-purposed it to act as a current measurement harness by cutting the trace to the power input and attaching each end to an ammeter.
Then, I was able to measure the exact current consumption during various usage cases (read, write, idle, etc). Below is a video of some of these tests.
After testing the power usage of a couple of different USB devices and asking around on hardware forums, I found out the problem was two-fold. First, when the Vita is powered off, it does not power off the USB voltage line, but it does pull both USB data lines low. Unfortunately, this leaves the USB device in “reset” mode instead of “low power suspend” mode. Likely this wasn’t an issue for the 3G modem because it was a custom design meant only to pair with the Vita and has a separate power management IC that is smarter than just looking at the USB data lines. The second problem is that the USB2244 is a power hog of a chip. It draws an average and minimum of 100mA when not in “low power suspend” (which the Vita does not support) even if there is no activity on the SD card.
As a result, I had no choice but to go for an “cheap Asia manufactured chips” even though there was less documentation and support. Luckily I found some datasheets and reference schematics for GL823 online and was able to buy a couple of them to play with. I discovered that cheaper doesn’t always means lesser quality. Not only did the GL823 consume less power (only 30mA average and 1.5mA in “reset” mode) but it also outperformed the USB2244 in read and write speeds as well! Even better, the GL823 does not require an external crystal so I can remove some of the area footprint as well. I really should have chosen this chip to start with.
I also purchased a dedicated USB power tester at this point so I was able to get quick data measurements.
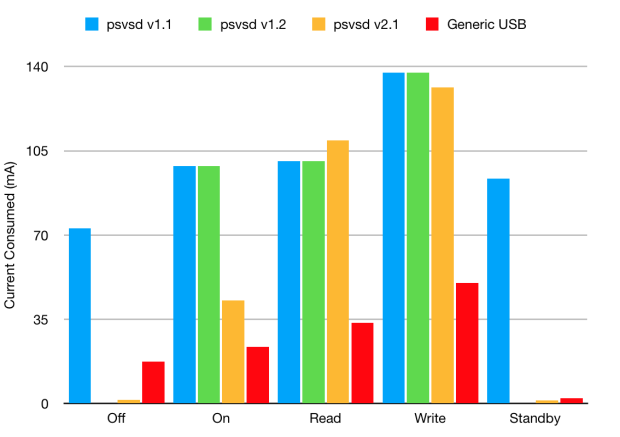
Because the extra hardware must be powered somehow, some dip in battery life is expected, but in the final design this dip is not noticeable at all.
What’s next?
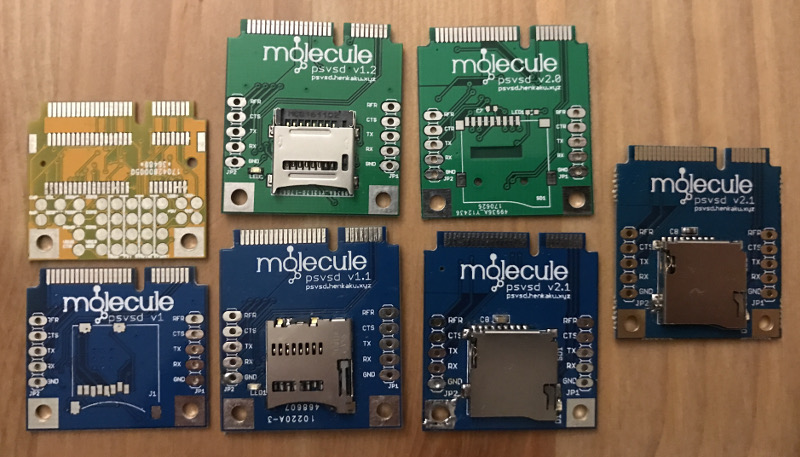
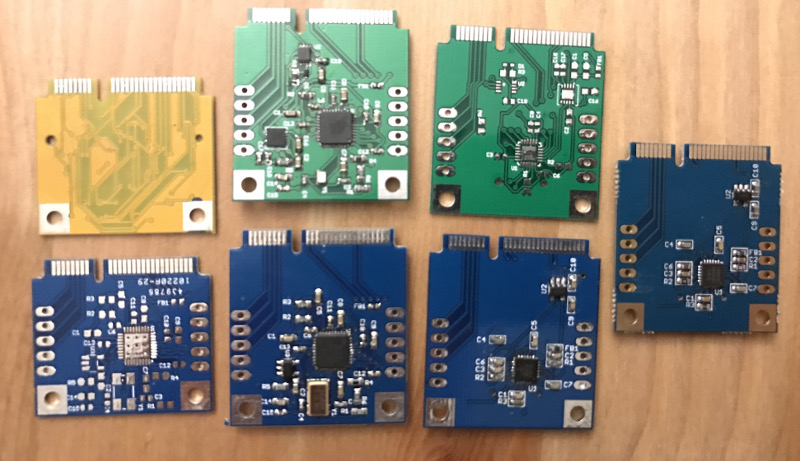
In the end, I made five prototypes and a breakout adapter. Here’s a family photo along with the final product to the right.
Thanks to everyone who contributed to this project! There are more detailed posts (with more pictures) for each step in the process on the Indiegogo page for those who are interested. You can find the design on psvsd.henkaku.xyz. Since the design is open source and free for commercial use, I think someone will manufacture, sell, and support it. Here’s another free idea: buy a large number of < 3.60 firmware 3G motherboards (they are around $15-25 a piece on Aliexpress) and screws (M1.6x4mm flat-head no countersink) and bundle them together with a psvsd adapter and a microSD card to form a Vita hacking starter kit.
I don’t plan to mass produce this myself but I do have at most 50 extra units due to canceled orders and extra parts. As a result, I’ve decided to auction them off to those who most want one up until September 2017. You can find more information about that here.
Thanks for the writeup, as always super clear and interesting. Do you feel the interest from the scene has gone down significantly since there is now the “other” option to go with sd2vita for microSD support? Beyond the learning experience, any other benefits at this point?
@Wololo, I don’t have a magic device that measures the interest of the “scene” nor do I care about what the “scene” likes or don’t like. However, here’s three facts. 1) some people (like me) own and play mostly physical games, 2) we can’t just dump our games because the current dumpers are shit and corrupt games and cause issues like saves disappearing after standby as well as saves being incompatible with non-hacked Vitas (via upgrading fw or CMA transfer), and 3) the gamecard_microsd driver is more complex than usbmc and therefore more likely to contain issues (one issue already discovered is that Vitas wake up from standby often which might affect battery life)–this can be fixed by software but nobody has picked up the mantel from xyz so who knows when it will be fixed or if it will ever be fixed. usbmc on the other hand has been in VitaShell for months and no issues have been discovered so far.
The amount you have done for the scene .. my goodness!! Thank you .. that was a great read.
Thanks for the writeup. Just wanted to say here that this was - for me - the best indiegogo funding experience ever. I really appreciated the information you gave in all of the updates, and the amount of detail you included in them. It gave me a great insight in what you did, and it showed motivation and dedication to the result. I can’t wait to receive the adapter.
I’m happy you managed to get some margin in the end, and I hope you use some of that cash to reward yourself properly :) Thanks again!
@Yifan: thanks for the reply, much appreciated!
I think that “IDGAF” attitude you have is what I like about you, Yifan. To hell with the scene, do what you feel is best for your own personal development.
I don’t mean to discredit SD2Vita by any means (it’s a godsend on PSV Slim; which I own in addition to my 3G Vita), but I feel your psvsd is far more interesting and impressive. If I can find the energy within me, I may sell some psvsd on eBay for a reasonable price. My only concern as of right now is, you mentioned on indiegogo that you had to manually do some soldering on the final design. Has the design been updated on your github page to include the card detect fix?
Completely agree with @Yifan couldn’t have a vita that i can’t play my physical media on (haven’t counted recently but over 130+ physical vita games). definitely looking forward to getting this installed in my vita and having access to emulation as well as physical media.
thanks for making this Yifan
Received my psvsd in the mail a few days ago. Works great. Big THANKS to Yifan for all the design/testing/revisions/retests/and finally delivering an awesome product.
Great work Yifan! Easy to install and setup!
Just have a few problems. I cant mount the USB with Vitashell 1.62( error 0x80244112) and some Games cant save (C2-2001-3).
It seemed to be a problem with the game and vitashell itself. so nothing from the driver or anything;)
Great works guys..thank you all.
@Yifan I’m glad this world has geniuses like you come around every once in a while. Without people like you, the world would be a very boring place!
big shit
BIG SHIT
Yifan please dump the module and install the capability in a sega gamegear or xbox one x scorpio
Great work! Another member of us like this too.
Yifan, I’ve seen others use your discover to create USB connections to that PCIE slot. I’m wondering is it possible to also charge and transfer data via that slot? Meaning instead of using the microsd card, could I create a Microusb port there that will allow me to charge the Vita and transfer data from the memory card to the PC?
Thanks for all your work.
No, you can’t charge/transfer data as it’s not a UDC port. It’s a USB host port so it’s like the USB port on your computer.
Etching a computer circuit boards (PCB) reception may be a would like that each electronic homebrewer has, virtually anytime he cares building a circuit. Of course, there area unit lots of techniques that don’t need etching, like victimisation protoboards, wire wrapping, dead-bug vogue and lots of others. These techniques is also glorious for the specified application, however in some cases, a real incised PCB may be a should. as an example once you would like many identical circuits, once you would like a particular track pure mathematics for terribly high frequency applications, once you desire a lovely and sensible wanting circuit, once you have to be compelled to use tiny surface mount parts (SMD) or in several different cases, there’s nothing sort of a true incised PCB. Etching PCBs reception isn’t terribly troublesome and needs little or no (and cheap) instrumentation, however it’s extraordinarily time intense. Etching PCB is to use the materials of chemical reactions or physical impact of technologies that area unit removed. Etching techniques are often divided into wet etching and dry etching, chemical resolution utilized in wet etching through chemical reactions so as to realize the aim of etching, dry etching is sometimes a plasma etching, its result is also the impact chips by plasma surface physics, or probably a plasma activated chemical change between base and surface atoms, or perhaps role is also a composite of the 2. https://www.allpcb.com/pcb_etching_process.html?code=P9
3151LT Flange Mount Differential Pressure Transmitter-Level Measurement
https://www.china-transmitters.com/pressure-transmitter/flange-mount-pressure-transmitters/3151lt-flange-mount-differential-pressure.html
hello still has to sell. or where can I find these adapters
Nice project! Now pcie to micro SD Cards are available on aliexpress mostly made for use in notebooks. I wonder if they can be used in a vita as well?
Kind regards, Martin