For the past couple of months, I have been trying to extract the hardware keys from the PlayStation Vita. I wrote a paper describing the whole process with all the technical details, but I thought I would also write a more casual blog post about it as well. Consider this a companion piece to the paper where I will expand more on the process and the dead ends than just present the results. In place of technical accuracy, I will attempt to provide more intuitive explanations and give background information omitted in the paper.
DFA
For a nice practical introduction to differential fault analysis, check out this article on using DFA to attack white-box software AES. The authors give a good explanation that is not overly academic and actually presents code at the end (which we use for our attack). The main idea of DFA is this: we can use glitch attacks on AES hardware just as we can on processors, but instead of using it to control code execution, we use it to make faulty AES encryptions with the right key. Since AES is a brittle algorithm, slight modifications will cause it to leak information about the key in unintended ways and we abuse this fact.
Unfortunately, there is not much interest in AES DFA outside of academia. A search on Github shows a handful of results and overall we only found two serious implementation of AES DFA attacks. dfa-aes is an implementation of a 2009 paper where a single precise fault in round 8 and $2^{32}$ brute force can yield the AES-128 key. phoenixAES (from the authors of that article linked to above) is an implementation of a 2003 paper which requires two separate precise faults in round 8 and no brute force (although later on, we will later describe some modifications that relaxes the “precise fault” requirement and increases the required brute force to about $2^8$). There has been many other papers published from 2002 to 2016 describing attacks that assume faults in earlier rounds or more bytes are affected by a fault or other parts of the algorithm. However, we were not able to find any source code attached to these papers. In the end, we derived our work from phoenixAES even though it was not state-of-the-art because writing code is boring and most of the improvements in the literature do not mean much in practice (one hour vs five minutes is a lot of time but if you only have to do it once, the time it takes to write all that code and debug it would negate the gain).
With that rant aside, the main bulk of work is in perfecting our glitching setup in order to inject precise (as in corrupting no more than a single byte) faults on the AES engine during round 8. Once we have that in place, we can feed the collected samples into phoenixAES (or dfa-aes) and it should Just Work.
DPA
Before getting into how we designed the setup for DFA glitching, it is worth sidetracking into our (failed) attempt on a DPA attack on the Vita as context for some of the design decisions made later on. Differential power analysis is a type of side channel attack where if the attacker observes the power consumption of the AES engine while it is operating with a secret key, then it is possible to leak the key. First she hypothesizes the value of a part of the key. Next, the attacker defines a power usage model of the AES engine to predict how much power is consumed if a random input is encrypted and the hypothesis was correct. Finally, she actually runs the engine with that input and measures the actual power consumption to see how close the prediction was. By repeating this many times and for different parts of the key, it is possible to find the entire key. Chipwhisperer wiki has a great introduction to how differential power analysis works that goes into much more details but is still approachable.
In order to do DPA on a target, you need to be able to precisely measure the current in the chip. One way is an application of Faraday’s law: a changing magnetic field induces a voltage. You can measure current with a “magnetic probe.” Colin O’Flynn described at Blackhat how to build your own magnetic probe and I managed build one and to get it to work with the ChipWhisperer example target.
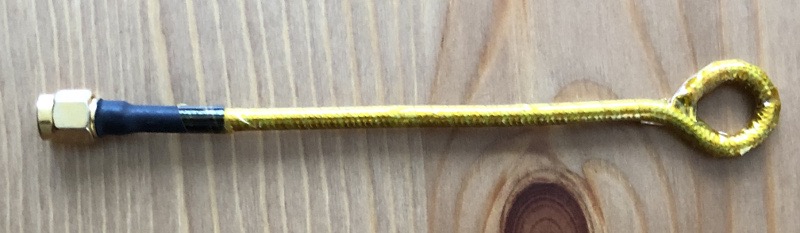
Unfortunately, the size of the loop determines how precise your measurements can be. The DIY $5 probe has a loop size almost as large as the entire chip while the AES engine is less than 1% of the total area of the chip, are we were unable to get a good signal-to-noise ratio. A good current probe with a small loop size can run for thousands of dollars, and that was outside the budget. An alternative way of measuring current is an application of Ohm’s law: a change in current through a resistor is equivalent to a change in voltage across a resistor. This requires changing the circuit to introduce a small resistor between the power supply and the target chip. As the chip consumes more power, it will pull a larger current from the supply, which causes a larger drop in voltage across the resistor.
To make use of the shunt resistor measurement, we need to first cut the trace in the PCB from the power supply to the target chip. Then we connect the target chip to our custom board, which has a shunt resistor as well as a port for a measurement probe. We use an external power supply to power the board (we could have used the Vita’s own supply but it was easier to just attach an external supply).
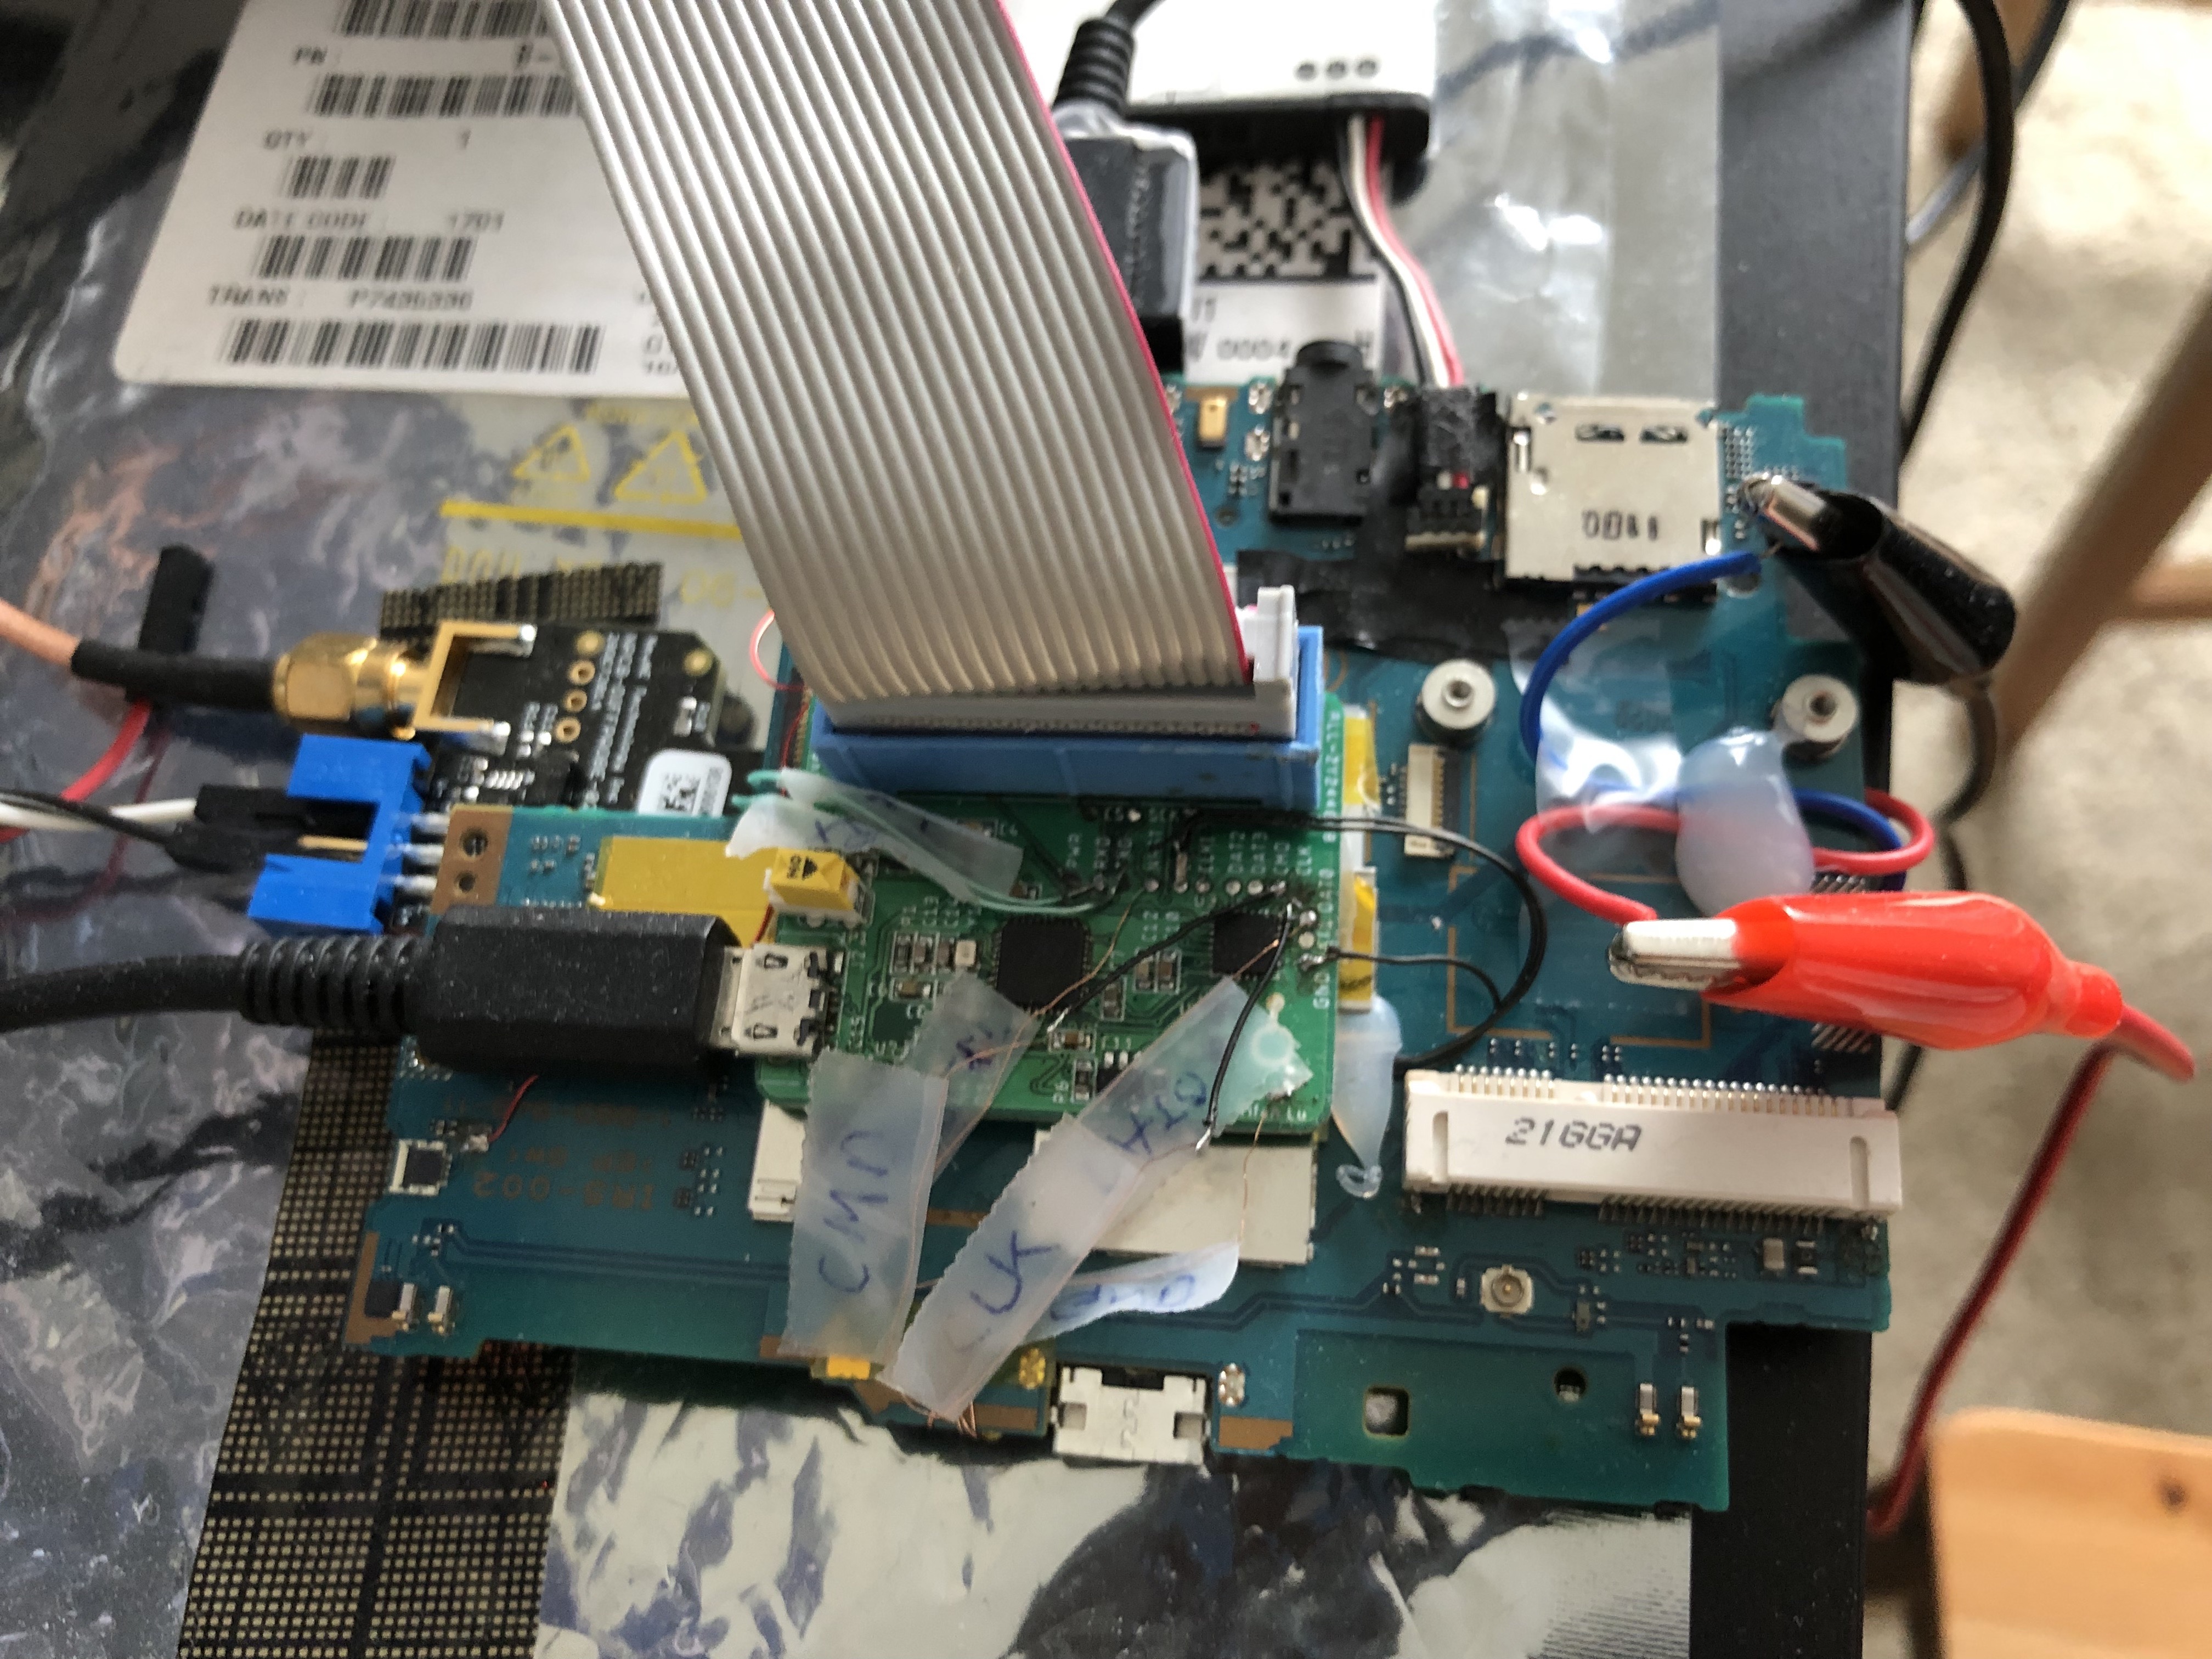
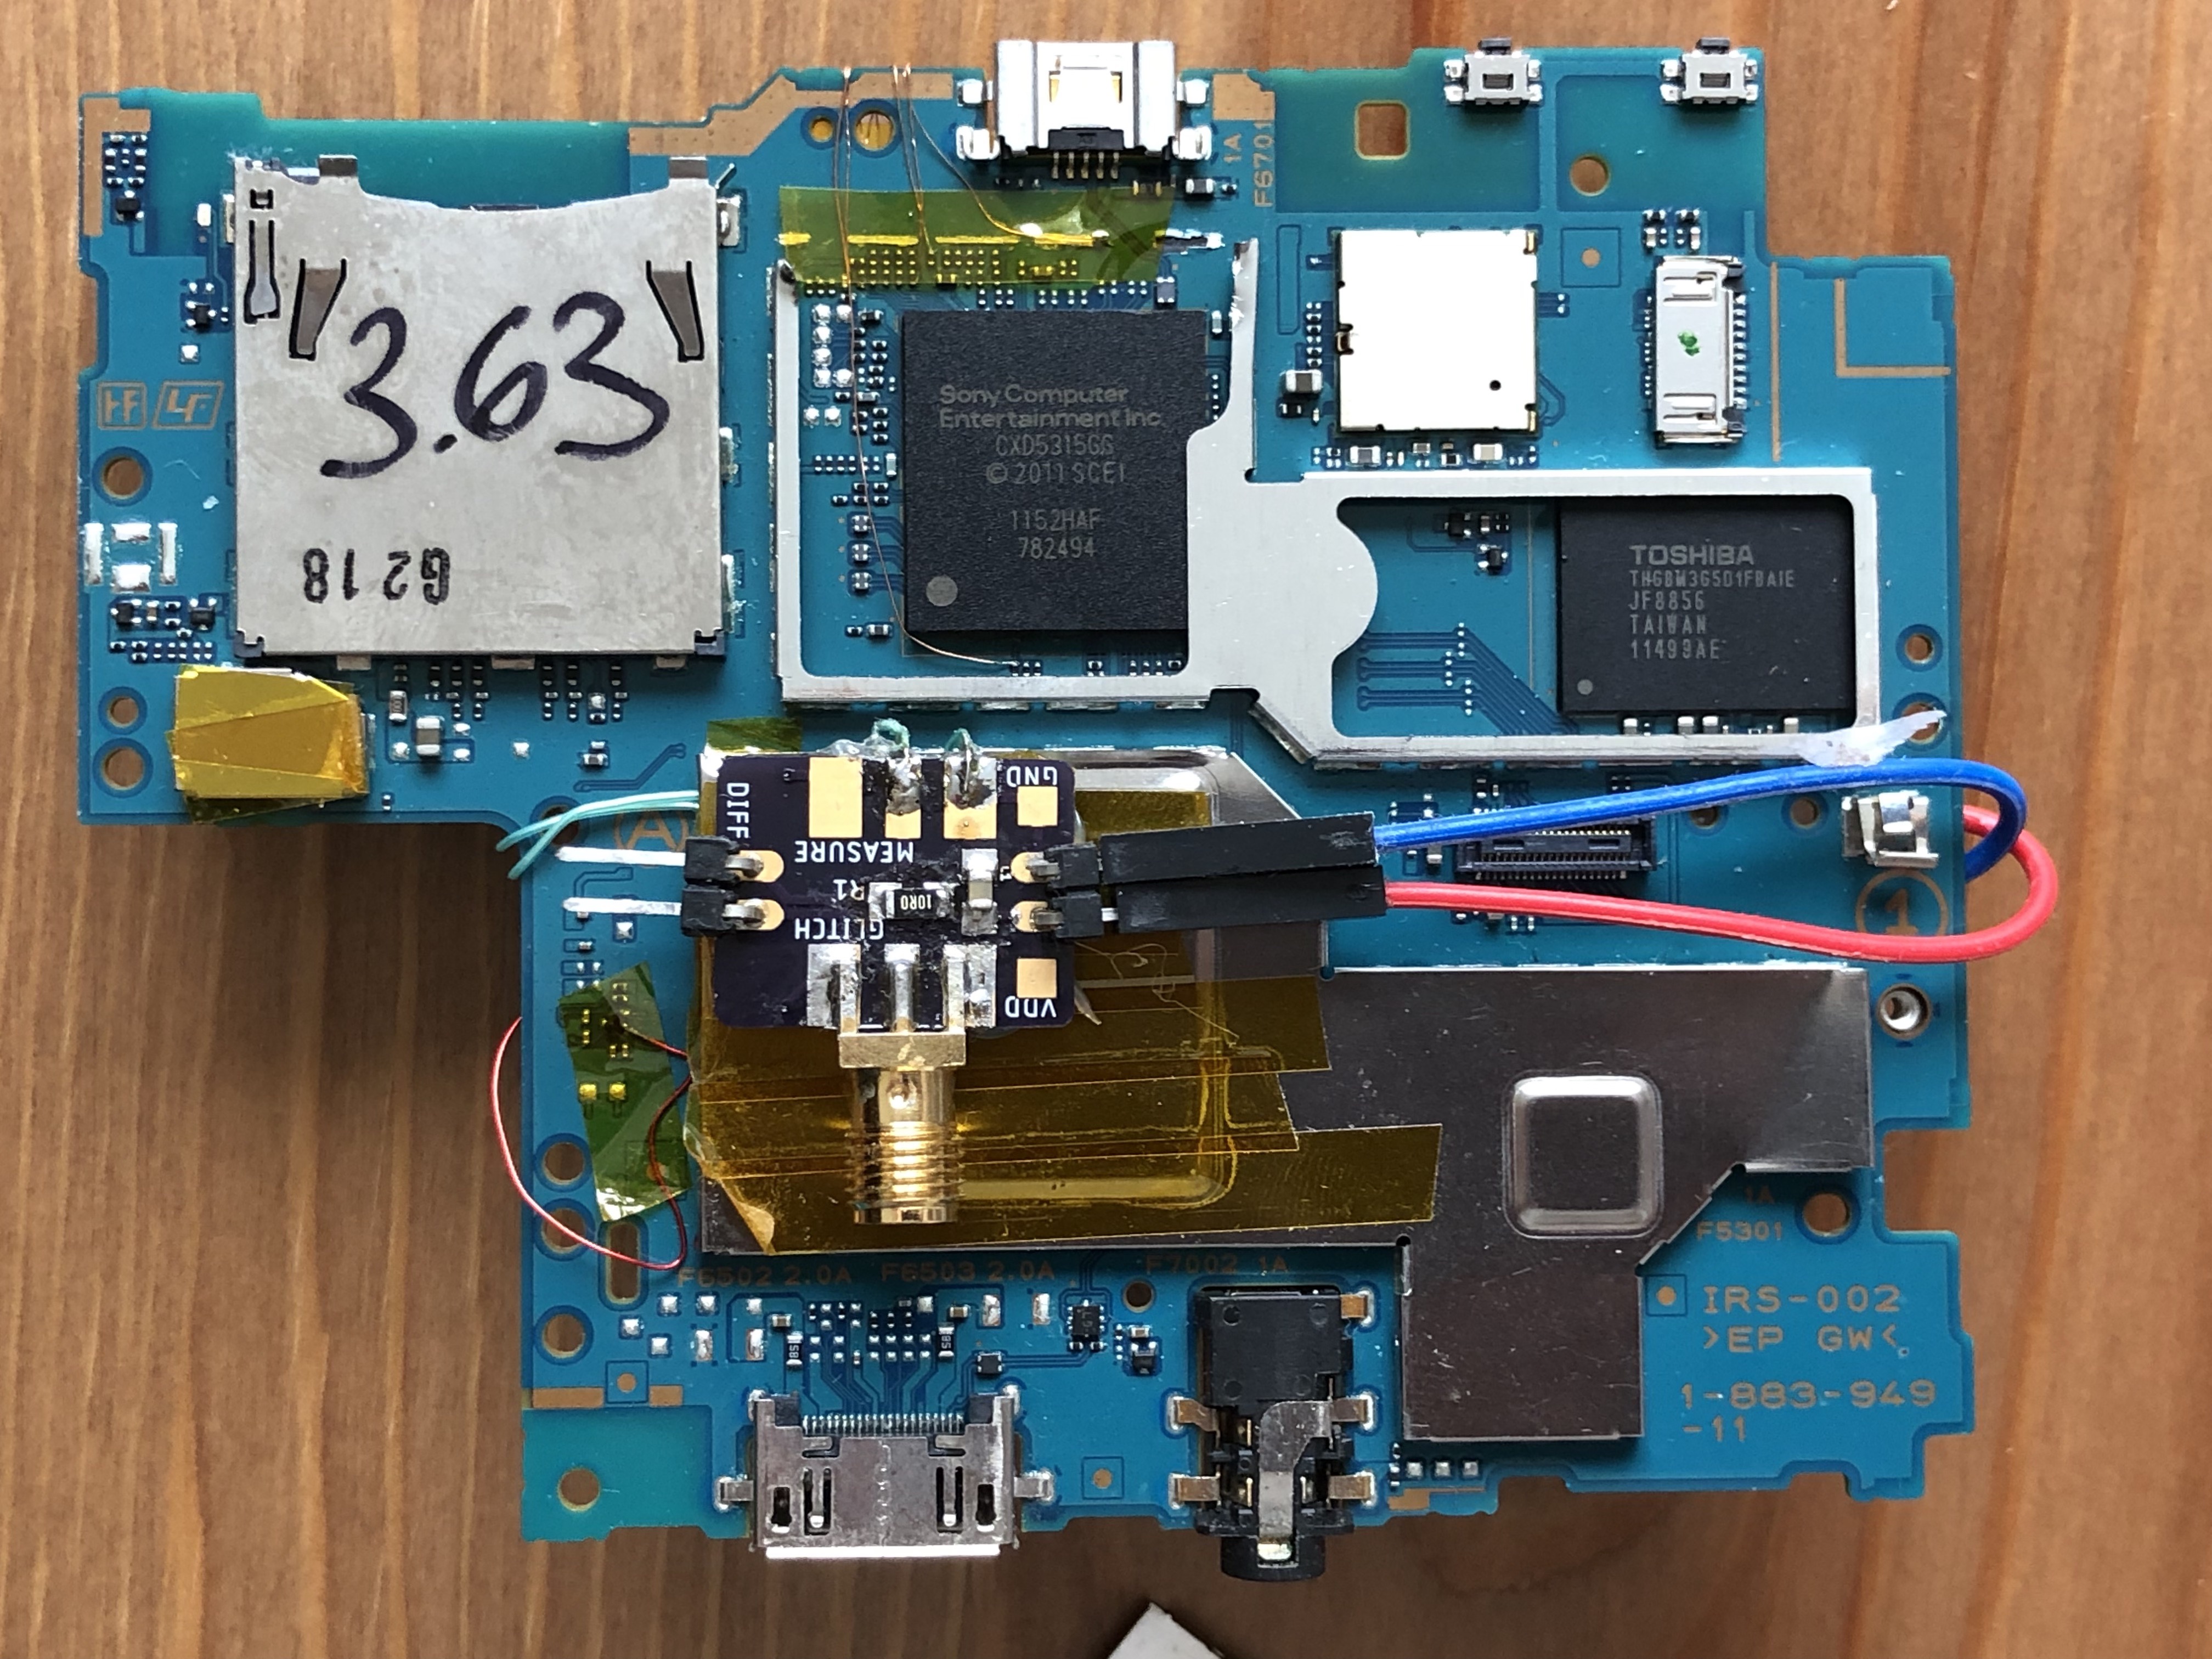 Custom designed psvcw board has a shunt resistor, a filter capacitor, and ports for the differential probe and CW glitcher. Also shown on top are the wires probing the eMMC signals going to the target chip. We use them to both flash our payload to the eMMC as well as to trigger the voltage glitch to gain code execution.
 External power supply connected to psvcw.
However, even with the shunt resistor method, we were unable to get a good SNR. There was too much external noise (which is possible to get rid of with enough work) but also too much internal noise (which is much harder to get rid of). We observed that the SRAM read/write operations dominate the power trace during the AES encryption (by many magnitudes) so it would be difficult to find any correlation between the traces and the key. We determined that DPA was not possible with out setup because the Vita’s SoC was designed for low power usage. It would have been far too expensive to get the right equipment needed to increase the SNR.
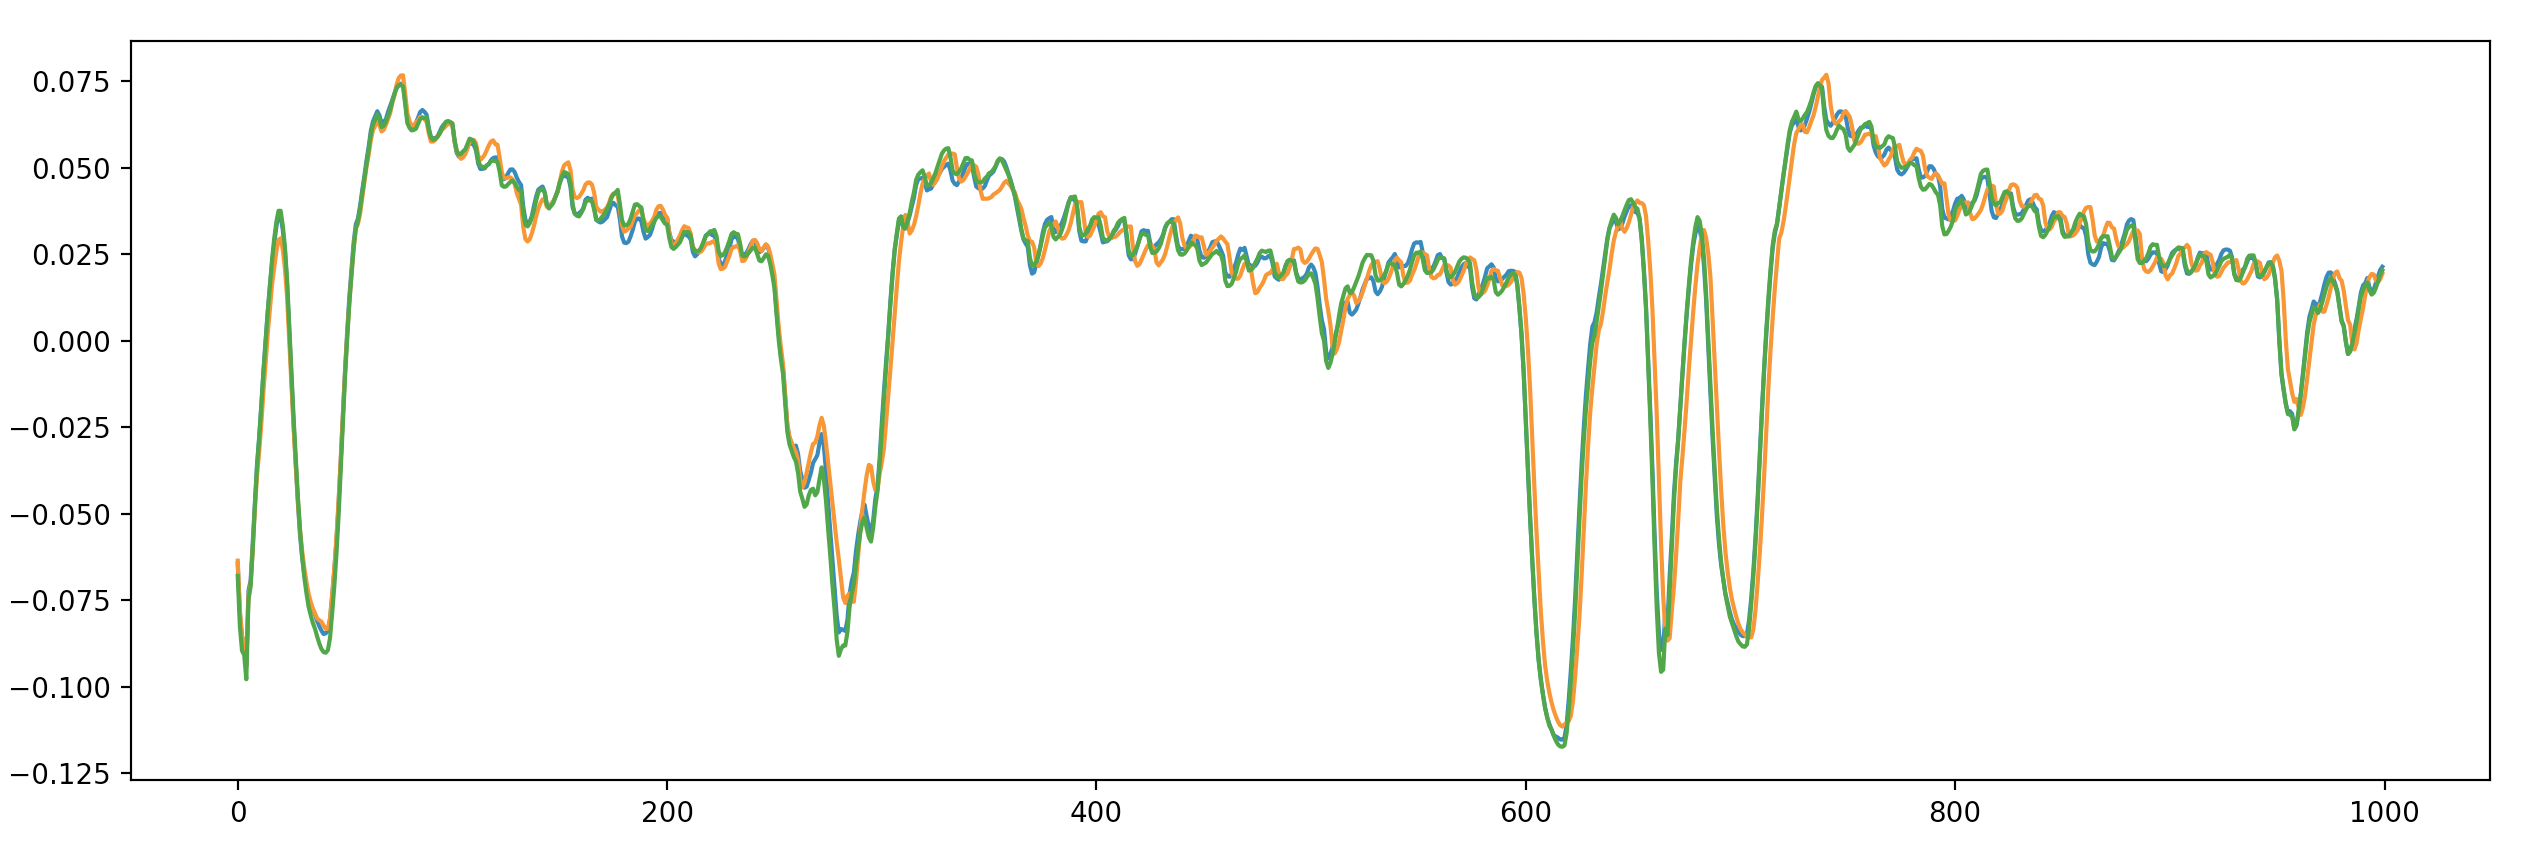 From 0-50 cycles, the trigger GPIO signal toggles on. From 250-350 cycles, the AES operation takes place. At cycle 600, the trigger GPIO toggles off. The small dips all throughout are likely F00D processor operation.
Despite having similar names, DPA and DFA are not similar at all. DPA is a (passive) side channel attack while DFA is an (active) fault attack. However, all the work in attempting DPA was not wasted. First, we gained valuable information on when the AES operation takes place. By comparing the trace of a single AES operation with other traces we collected (i.e. with no AES operation or with multiple AES operations), we conclude that the AES operation happens where the power dips at around 250-350 cycles after the trigger. The PCB modifications we made to insert a shunt resistor and reduce the SNR in the measurements also serves the dual purpose of allowing for more precise glitches. This is important because previously, we were targeting the security processor with glitches (in order to get code execution), and it was fine to glitch for multiple cycles in order to cause some effect. However, with the AES engine performing 4 operations per cycle, we need to be able to cause sharp voltage spikes without it being filtered out by the device’s power distribution network. The shunt resistor helps with this.
PlayStation Vita’s security architecture
Why is the Vita, a commercially failed product from Sony, such an interesting attack target? Those who follow my blog can see that for the past couple of years, the Vita has dominated my interest. Besides wanting to show some love for my favorite overlooked console, the technical reason for why I enjoy hacking the Vita is because it is an extremely unique device that implements a lot of security features “right.” The device was released in 2012, when most Android phones did not have basic exploit mitigations such as address randomization enabled and when its direct competitor (the 3DS) had significant hardware and software security oversights.
(I’ll attempt to provide some background trivia on the software security, but feel free to skip this if you’re not interested.) The OS is completely proprietary with some pieces derived from NetBSD and other pieces from Sony PSP (which itself is proprietary). In a world where most devices run either BSD, Linux, or some RTOS, it is always exciting to see, as a reverse engineer, a new OS. Proprietary does not mean secure though. While it was extremely difficult to find the “initial” bug to dump the kernel (we exploited one of the few NetBSD derived components back in 2013), hiding the code is not security, but obscurity. However, to Sony’s credit, for a whole year nobody was able to dump the kernel and even after we dumped it, nobody else managed to do it for another three years (until we released a jailbreak). The kernel itself has all the standard mitigations against buffer overflow attacks and protections against leaking addresses. It also had some non-standard (at the time) mitigations such as SMAP and syscall firewalls. The Vita also uses ARM TrustZone but at a time where Android phones would store all their secrets in TrustZone, the Vita only uses TrustZone as a buffer to interface with the F00D security processor. Only TrustZone can directly communicate with the F00D processor, but there are no secrets in TrustZone itself, which is a good idea in hindsight.
Bigmac
If we want to see how content (games, data, firmware, updates, etc) is decrypted, we have to look at the F00D processor, which is a satellite processor that handles all the cryptographic and security critical tasks. F00D runs on a largely undocumented architecture but we were able to hack it in due time. However, even hacking F00D is not enough to fully “own” the system. There are many cryptographic keys inside F00D code, but the most important keys including the ones that decrypt the bootloader are hidden away in the silicon and only accessible by the hardware AES engine we call Bigmac. There are 250 of these keyslots. 30 of these keys are called “meta” or “master” keys because Bigmac is only allowed to use them to encrypt data to another keyslot (i.e. to derive keys). It is not possible to directly use the master keys to encrypt data and see the ciphertext.
Most of the keyslots (including all the master keys) are locked before the bootloader is executed. That means only the boot ROM is allowed to use them in Bigmac. So, to summarize the roadmap, here is what we had to have hacked before even getting to this point: WebKit to gain initial execution, ARM kernel, ARM TrustZone, F00D kernel, and F00D boot ROM. Starting from scratch, it took us six years to get to this point and with the exception of F00D boot ROM, it was all done with software vulnerabilities. (We have dumped all our knowledge in a community-maintained wiki.) A reasonable observer might wonder what the point of all this is. For all practical purposes, hacking ARM kernel is enough to jailbreak the system, run homebrew and mods, and (unfortunately) pirate games. However, the reasonable observer would likely have no fun at CTF events. Six years ago, I set an arbitrary goal for myself: to get the decryption key for the bootloader. The idea is that if we can decrypt the first piece of loadable code, then there is nothing Sony can do to hide code in future updates. Later on, this “root decryption” key gained a name: slot 0x208 (a meta key). This post is on capturing that final flag, the last leg of this six year journey.
Glitching and DFA
Previously, I talked about how voltage glitching can be used to get boot-time code execution on the F00D security processor. How is DFA related? Because most keyslots are locked before the boot ROM exits into the bootloader, we need to perform the DFA attack after taking over boot ROM. To do that, we have to repeat the voltage glitch attack on F00D with the same glitching parameters we found before. Previously, the payload we executed just dumps the boot ROM but it has now been replaced with a RPC so we can control Bigmac from the PC though ChipWhisperer’s serial interface. Once this RPC payload is running, we can perform a second glitch with a different trigger signal and different parameters so that it causes a fault in Bigmac AES. The primary task is to find this second set of parameters. Once we have them, we can start collecting faulty ciphertexts by using the RPC to send the Bigmac command, triggering the glitch, downloading the faulty ciphertext, and repeat. With enough faulty ciphertexts, the final task is to do the DFA attack to extract the key.
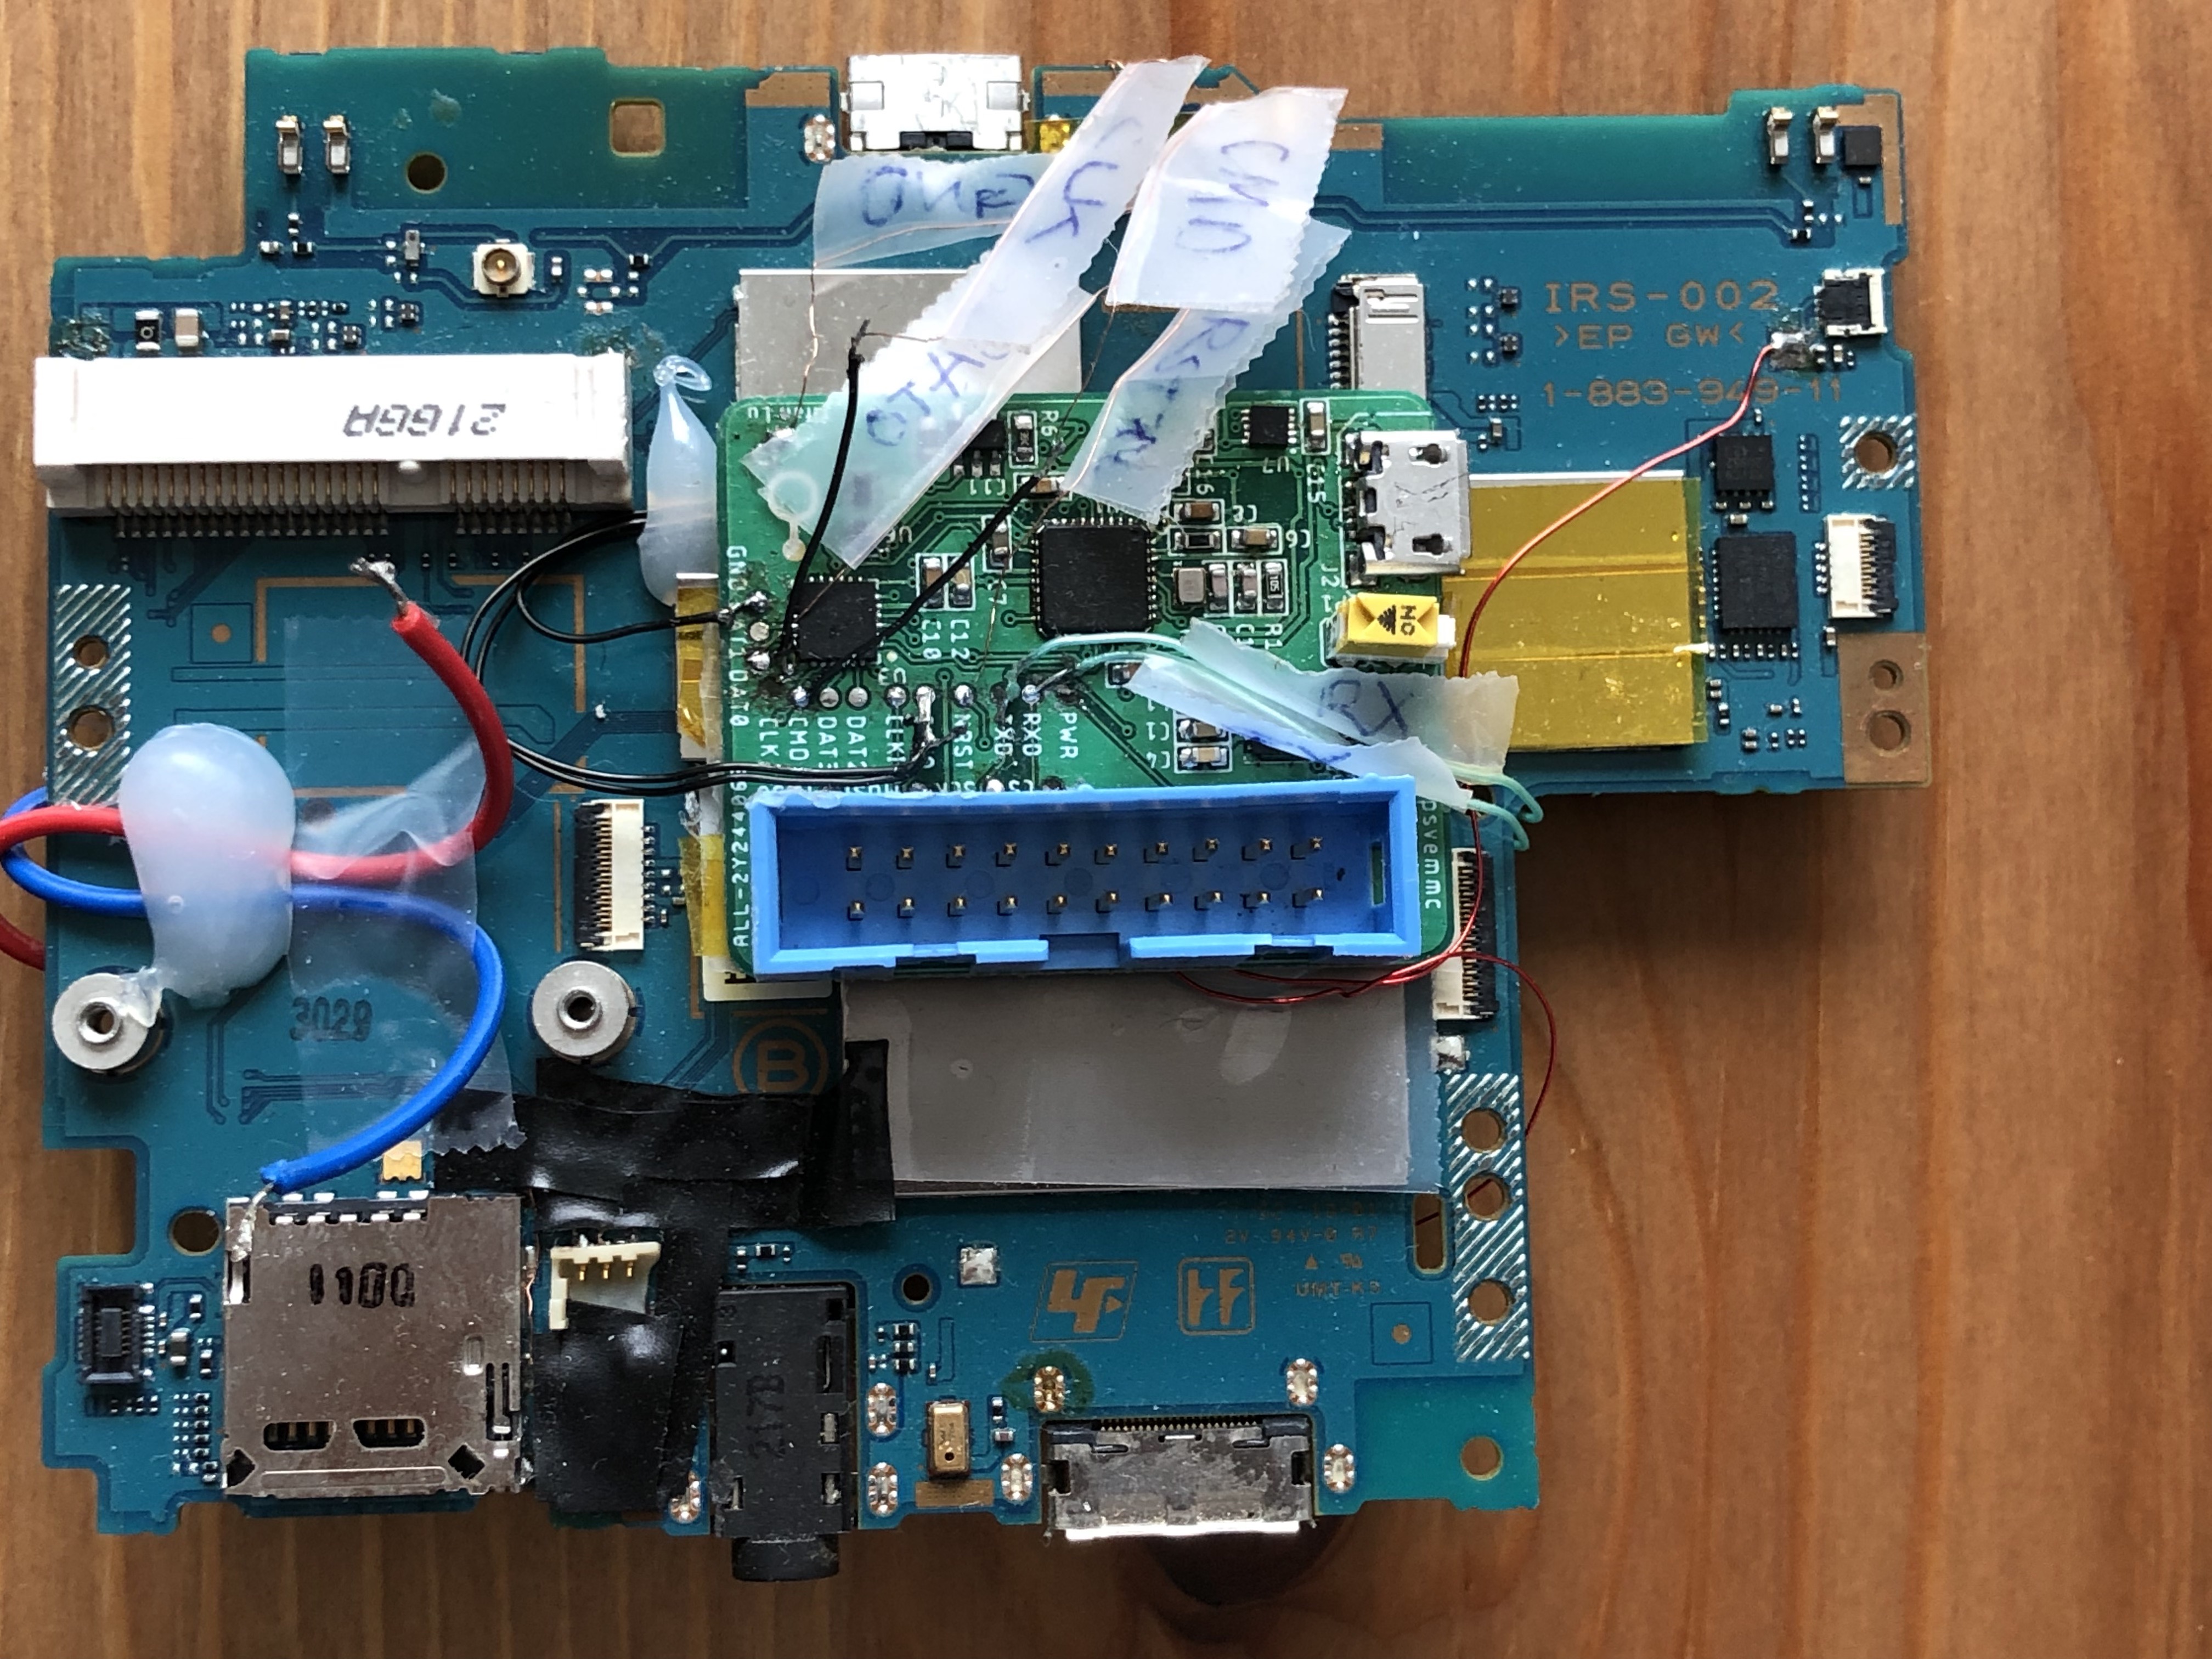 psvemmc board gathers all the required signals from the Vita’s PCB in one place. It includes wires for eMMC triggering (going to the back of the board), clock (replacing the Vita’s own clock synthesizer chip), UART, power, reset, and GPIO triggering (reroutes an LED signal). It also has a switch to enable eMMC flashing mode which uses the USB2244 and a level shifter to support 1.8V eMMC flashing over USB.
 Everything hooked up and working.
Analyzing faulty ciphertexts
To inject a fault into the AES operation, we use the RPC to toggle a GPIO pin and immediately kick off Bigmac. The GPIO toggle sets a reference point and serves as a trigger for the glitcher. We need to wait some number of cycles after the trigger before performing the second glitch. We know from the power trace above that between 250 and 350 cycles the AES encryption takes place. When we try glitching at offsets 240-280, we get faulty output ciphertexts. However, we do not know which round is affected or how many bytes in the state is corrupted. Recall that to use phoenixAES, we need two faulty ciphertexts where each one has a single byte corrupted at round 8 and the two faulty ciphertexts are not the same.
To figure out the relationship between the cycle offset and which AES round is being faulted, we can pass in a known key to Bigmac and try to encrypt a known plaintext. Then we “decrypt” the faulty ciphertext using our known key. At each step of the decryption, we can diff the state matrix with that of the same step decrypting the correct ciphertext. We can assume the step with the least number of bits in the state flipped is the step that we managed to fault. Why? Because AES, by design, ensures a property called diffusion. This means that a single bit flip in the input should, on average, result in half the bits in the output to be flipped. Each step in AES attempts to propagate a small change in the state to as many places as possible. For example, let’s say we managed to inject the fault right after MixColumns in round 5 such that a single bit is flipped in byte 0 changing 0xAA to 0xAB. In round 6 SubBytes, byte 0 is passed into the S-Box, where an input of 0xAA yields an output of 0xAC but an input of 0xAB yields an output of 0x62. Note that we now have 5 bits flipped. Continuing to round 6 MixColumns, we see that each column is scrambled which means that 4 bytes are now different. Then in round 7 ShiftRows, each of those 4 bytes are repositioned to a different column and another MixColumns will scramble each column some more (now all 16 bytes are different) and so on for another 3 rounds. It’s easy to see how a tiny change in the state of one round will result in huge changes in the state as we go through more rounds.
Using this, we can collect many sample faulty ciphertexts at each offset and see which round is mostly affected with each offset. The video below shows this working in action: we change up the glitch offset and trigger a glitch and then immediately analyze the faults to see what round was affected and which bits in the state were flipped.
Watch DFA analysis script + fine tuning glitches - Vita Hacking from YifanLu on www.twitch.tv
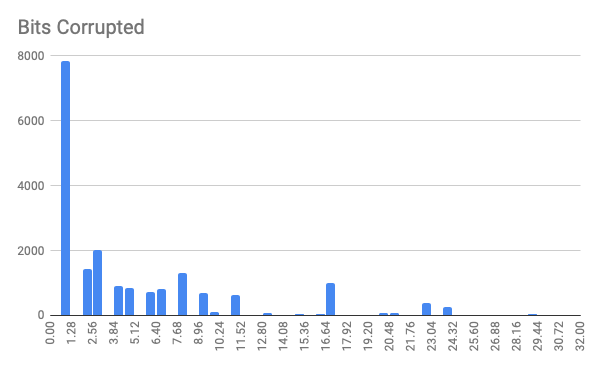
Additionally, we also found that regardless of the offset, the majority of our faults affects only one or two bits. This is better than what phoenixAES requires (a single byte corrupted).
Extracting keys
With the right offsets, we can get faults at round 8. With high probability, we get 1-2 bit flips and it works for what phoenixAES requires. However, what if we’re unlucky and we happen to collect two faulty ciphertexts with > 1 byte corrupted? We did run into this issue (and it’s not completely based on luck). The “best” solution here is to change the fault model. We’re using the model first proposed by Piret in 2003 and implemented in phoenixAES. However, later models allow up to 12 bytes of corruption (although there are some restrictions). Since we’re lazy and don’t want to write a lot of code, we can do something suboptimal.
Dumb DFA
The key insight here is that if we pass in two faulty ciphertexts that do not “fit the model” (have more than 1 byte corrupted), it will return no solution. So, how about we just try every combination of faulty ciphertext? How many would we have to try before we find a working pair?
Let’s assume that with probability $p=0.25$, we get a 1-byte faulty ciphertext (the histogram above shows this estimation is conservative). The number of ciphertexts, $X$, we expect to collect before getting one such ciphertext follows a geometric distribution and $\mathop{\mathbb{E}}[X]=1/p$. By linearity of expectations, two such ciphertexts would require $m=2\mathop{\mathbb{E}}[X]=2/p=8$ samples. (In reality each trial is not independent, but this gives us a rough idea.)
If we have $m$ samples, then our “brute force” method would require ${m \choose 2} = O(m^2)$ tries to find the key. Practically, with $m \lessapprox 2^{16}$, this dumb brute force solution out-performs the 2009 result implemented by dfa-aes (see the section on DFA at the start) which requires only one fault in round 8 but $2^{32}$ brute force.
Slightly more dumb DFA
It would be great if we can assume independence on which bits are flipped by the fault injection. However, in reality that is not the case because “which bit gets corrupted” is dependent on the physical layout of the transistors along with process variations and the data being processed. For about $20\%$ of the slots, we were unable to get any faulty ciphertext with just one byte of corruption in round 8. Since we were already brute forcing the two input faulty ciphertexts to phoenixAES, on a whim, we also decided to replace the correct ciphertext input with each faulty one (for ${m \choose 3} = O(m^3)$ number of attempts). Like magic, this worked and we got the remaining keys! Now, depending on the kind of person you are, you can either consider this a gift from God or you can stay up all night wondering why it worked. The proof is presented in the paper but is a bit technical and not too interesting. The short version is that since we are doing differential analysis, if the same bit is flipped in the “correct” ciphertext as well as both corrupted ciphertexts, everything still works out. This means that the lack of independence in the flipped bits actually turned out to help us.
There is a downside though. We lose the assumption that if we find a solution, then it will be right. For a handful of slots, we accidently corrupted the state for two rounds instead of one and ended up with a slightly wrong key. However, once we identified this error, we were able to recover the right key by assuming at most 4 bits of the key were wrong (recall the distribution of the number of bits corrupted by the glitch) and then brute forcing $256^4$ possible ways the key got corrupted.
Extending to AES-256
So far, we only referred to attacking AES-128 keys. However, extending it to AES-256 is not too difficult. Instead of attacking round 8, we attack round 12 for the same results. This only gets us half the key, though. To get the other half, we need to apply the round key we found to reverse a single round of AES. Then we attack round 11 the same way and with the two round keys combined, we can get the full key.
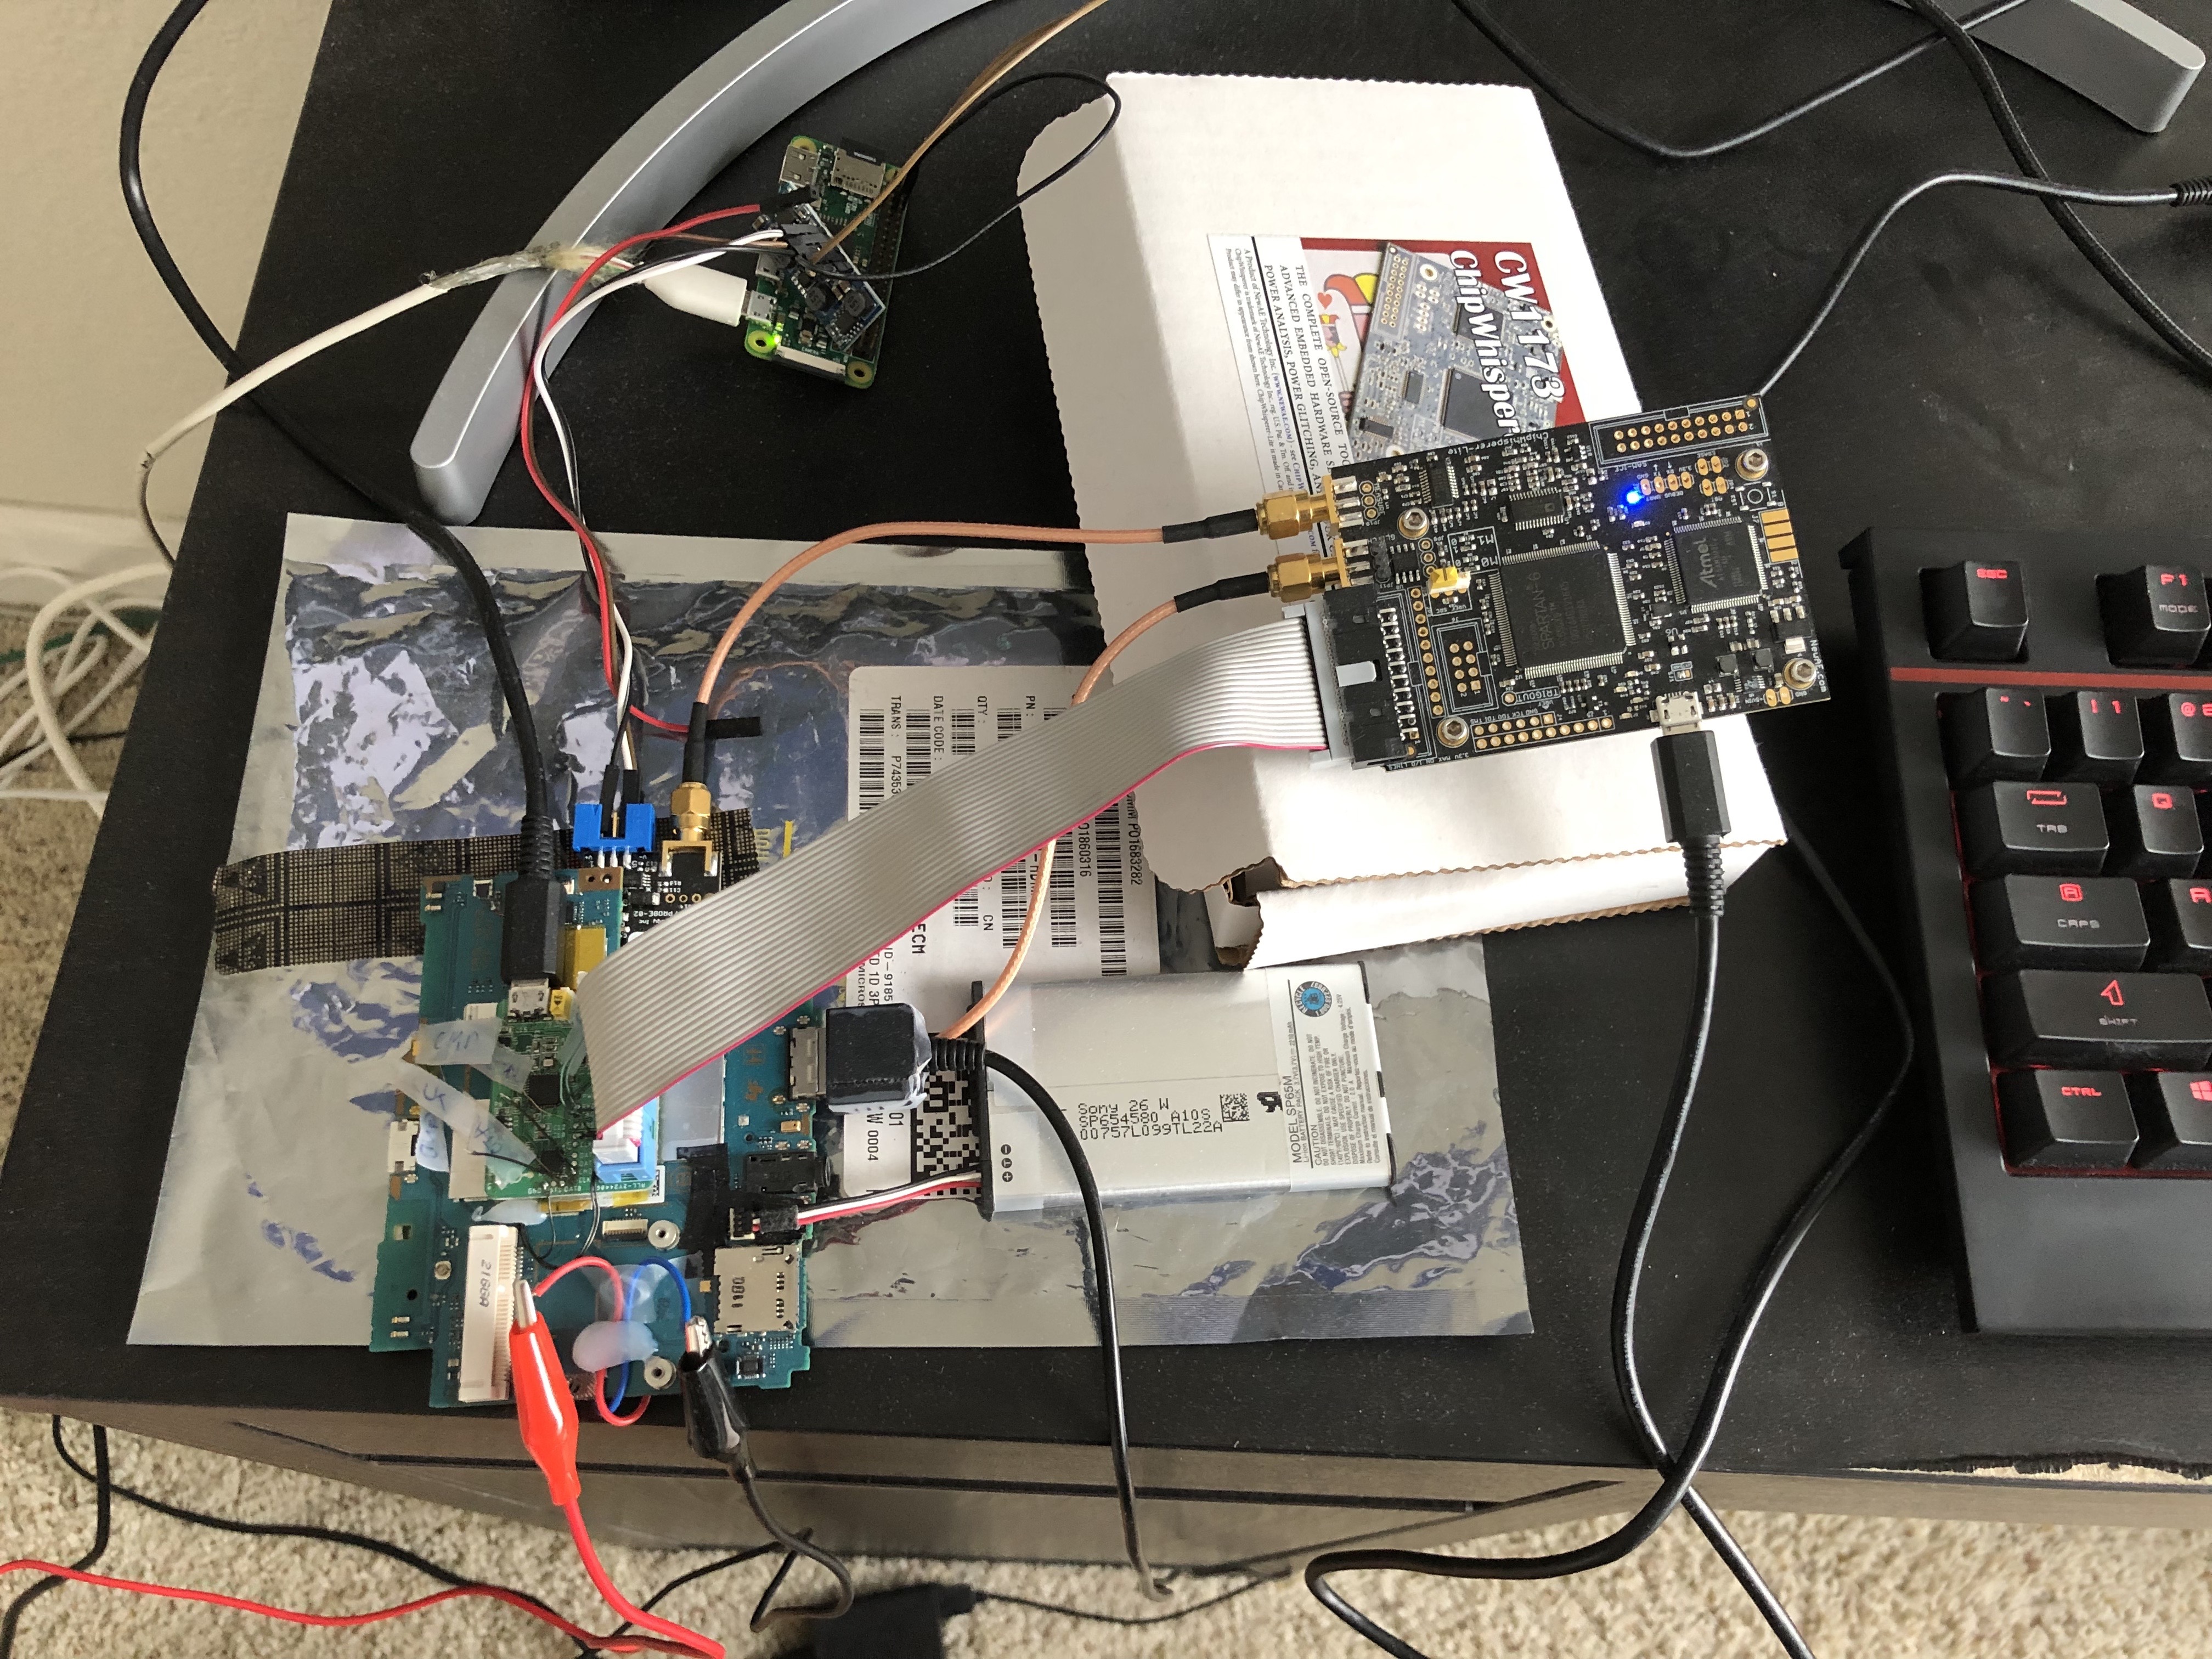 The complete setup: psvemmc powered by USB and connected to ChipWhisperer over a 20-pin connector. The CW glitch port goes to psvcw glued on the bottom of the board which houses the shunt resistor. The CW measure port goes to the CW105 differential probe which plugs into the psvcw board as well. The power supply for the CW105 probe is a $5 DC-to-DC converter from eBay where the source is a RPI Zero powered through USB. The red and blue wire connects the external 1.1V power supply to psvcw. Finally the battery and USB multiconnector powers the Vita itself. The box is not just an advertisement; it holds the CW at a slight angle so the torque doesn’t rip the glue from the psvemmc board. This innovative solution was the result of weeks of frustration at wires falling apart.
Master keys
So far, everything described works for non-master keys. Recall from earlier that we said master keys cannot be used to directly encrypt content. Instead the process involves using Bigmac to encrypt some plaintext to another keyslot, where the slave keyslot cannot be read out either. Of course one way to get around this is to perform two levels of DFA attack: one fault to fill the slave keyslot and then $m$ faults using the slave keyslot in order to recover the faulty ciphertext for the master keyslot. However, we did not go down this route because we already know of a hardware vulnerabilty in Bigmac that exposes the slave keys.
Davee wrote a great post about how this vulnerability works. In short, because Bigmac does not clear the internal state after a successful encryption, if you perform a second encryption with size < 16 bytes (block size of AES), then it “borrows” the remaining bytes from that internal state (which happens to be the same as the slave key because it was the last encryption operation). Using this fact, we can brute force the remaining bytes with four $2^{32}$ tries to recover a single slave key. (You might notice a theme occurring here: if something doesn’t work, just brute force it.)
For each master keyslot, we collect around $m=100$ samples (to be safe) of these slave key “partials.” Then we run Davee’s tool to “bust” the partials and recover the slave key. This slave key is the corrupted ciphertext. Then we do the same DFA attack described above and we can recover the master key as well.
For the partial busting, we spinned up an AWS c5.18xlarge spot instance (with has 72 AES-NI enabled cores), which can bust one partial in around 15 seconds (the longest we’ve seen was still under than a minute).
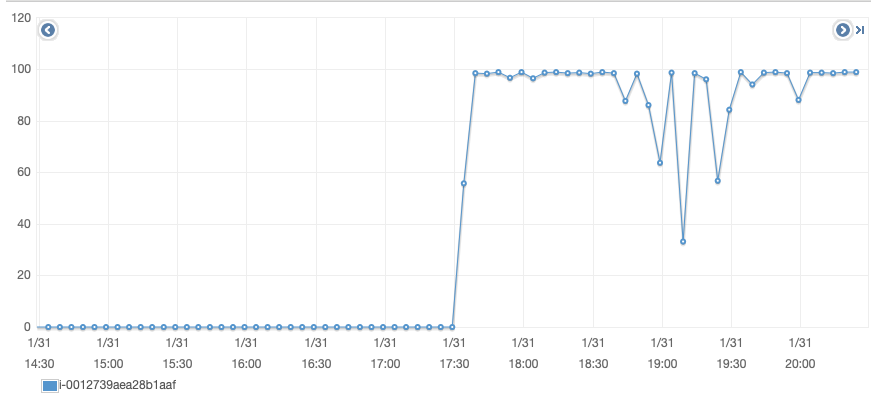 AWS EC2 core utilization over a couple of hours.
Conclusion
We recovered all 30 master keys including the slot 0x208 key.
Last hash before I turn into a Switch hacker. Full Vita 0x208 key SHA256: 14127cc3f75e78239ae77a55a9ae42fe0bf9bace7d64a9401d1fdf844045c53d
— Yifan (@yifanlu) January 30, 2019
We also recovered 238 of the 240 non-master keys. The last two are AES XEX keys for full-disk-encryption and are locked out before we can execute the RPC payload (which is loaded from the eMMC). Getting them would require additional work that we did not find to be useful because the keys are device unique.
Costs
Such an attack is not as expensive as one might think. We are hobbyists working on this only during our free time for a span of half a year. We received no funding or access to any professional labs. The total cost of the whole experiment from the equipment to the boards to AWS EC2 was easily less than $1000. The majority of that cost was in the Rigol osciloscope (for debugging) ($400) and the ChipWhisperer Lite ($300). In a world where software attacks are getting harder and harder to pull off and companies are protecting more and more of their software with hardware security, it seems like a huge oversight that the hardware is not protected as well.
The remaining cost was dominated by the death of 9 Vita motherboards. Here are their obituaries: one gave the pinout for eMMC, two led to the realization that 3.3V eMMC damages the SoC, one taught the importance of not keeping the solder iron too hot, two brought caution in probing since shorting the adjacent 1.1V core to 1.8V IO is not allowed, one had internal metal on a cut trace warp and got shorted due to heat expansion from a reflow, two died from mysterious causes. (Thanks to everyone who donated spare Vita boards for this experiment.)
Say a prayer to all the Vitas who’ve given their lives in service of greater knowledge. pic.twitter.com/oaqQ562TRW
— Yifan (@yifanlu) February 2, 2019
Code
As always, all the tools referenced in this post are public and open source. Please check out the paper for more details on the setup and implementation.
- Our fork of ChipWhisperer contains all the modifications needed to glitch the Vita target.
- f00dsimpleserial includes the RPC payload, the ChipWhisperer scripts to run it, the ChipWhisperer scripts to glitch Bigmac and collect ciphertexts, the analysis scripts, and the DFA tools based off of phoenixAES.
- f00d-partial-buster brute forces the slave keys from the partials.
- psvemmc and psvcw target boards for interfacing with ChipWhisperer.
Will this “unlock” the pstv as well?
Is it still possible to watch the stream video of your F00D glitching attack?
It’s fantastic that you are getting ideas from this article as well as from our discussion made here.
Hi! Possible unlock the chip new generation? Example cpu intel or AMD cpu or GPU new generation or cpu IC ARM for tablet and smartphone??.